The headings in any content enhance its readability, whether on a screen or in print. They act as signposts, guiding readers to the most important parts of an article. Many visitors skim through content, focusing only on sections with headings that capture their interest. This makes headings an essential tool for engaging your audience.
However, the benefits of headings go beyond user engagement. Search engines also prioritize headings when analyzing and ranking content, making them a valuable element for improving SEO.
In this article, we’ll explore how to effectively use WordPress heading tags like H1, H2, and beyond to boost both readability and search engine performance.
Ready? Let’s get started!
WordPress Heading Tags: What Are They?
In WordPress and HTML, heading tags organize content into a logical structure. These tags range from <h1> to <h6> and help distinguish headings and subheadings from the main text. The hierarchy begins with <h1>, the most prominent heading, and ends with <h6>, the least important.
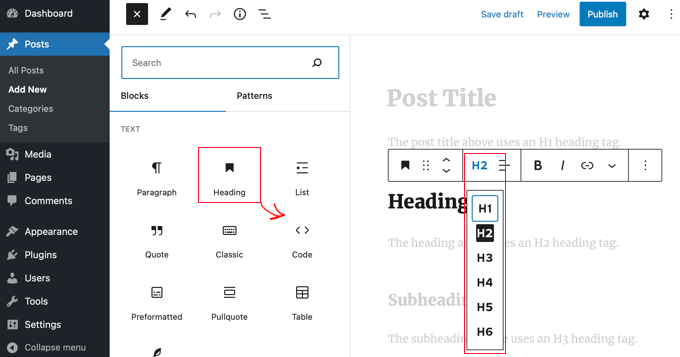
By using these tags effectively, you improve content readability and make it easier for search engines to understand the structure of your page.
The <h1> tag typically serves as the title of your post or page, representing the primary focus of your content. WordPress usually applies this tag automatically to blog post titles.
However, some themes may change this behavior, requiring manual adjustments in theme template files. Following <h1>, you use <h2> to break the main content into major sections. These sections can then be divided further using <h3> and smaller tags when necessary.
In the HTML markup, H2 looks like this:

Headings also impact the visual presentation of your site. While your theme’s stylesheet controls the sizes and styles of headings, WordPress makes it easy to insert and customize heading tags without needing to write code. With these tools, you can create clear, structured, and visually appealing content.
WordPress Heading Tags: Why Should You Use Them?
Headings on web pages serve a purpose beyond improving visual appeal. They provide structure to your content and help search engines understand the key topics on your page. Google evaluates headings to identify the relevance of your content to specific search queries. By using heading tags effectively, you make it easier for search engines to understand your content and improve its discoverability.
Benefits of Using Heading Tags in WordPress:
- Enhance Content Readability
Headings break your content into organized sections, making it easier for readers to follow and engage with your message. They allow users to quickly skim through your page and focus on the parts most relevant to them. - Support SEO Efforts
Heading tags help search engines like Google understand the structure and focus of your content. By including keywords in your headings, you signal the importance of those terms to search engines, improving your page’s chances of ranking higher. - Improve Content Structure
Headings create a logical hierarchy within your page. Starting with <h1> for the main topic and breaking it down with <h2> and <h3> tags allows readers and search engines to see how the sections are connected. - Highlight Relevant Keywords
When keywords are included in heading tags, Google considers them more significant. This can help your content appear in search results for those terms, potentially driving more traffic to your site.
In the sections below, we’ll show you how to apply these tags and customize their appearance step by step.
How to Add WordPress Heading Tags in any Post or Page
We will show you the three easiest ways to add header tags in WordPress:
Method #1: Using the Gutenberg Heading Block
The Gutenberg editor in WordPress makes it quick and straightforward to add heading tags to your content. With just a few clicks, you can insert a heading, choose its level, and structure your content effectively. This approach is user-friendly, even for beginners, and requires no technical skills or coding knowledge.
Steps to Add Heading Tags with the Gutenberg Editor:
- Open the Post or Page: Navigate to your WordPress dashboard, and open the post or page where you want to add a heading.
- Insert a New Block: Click the “+” button on the editor to add a new block.
- Select the Heading Block: From the block menu, choose the “Heading” option to add a heading block to your content.
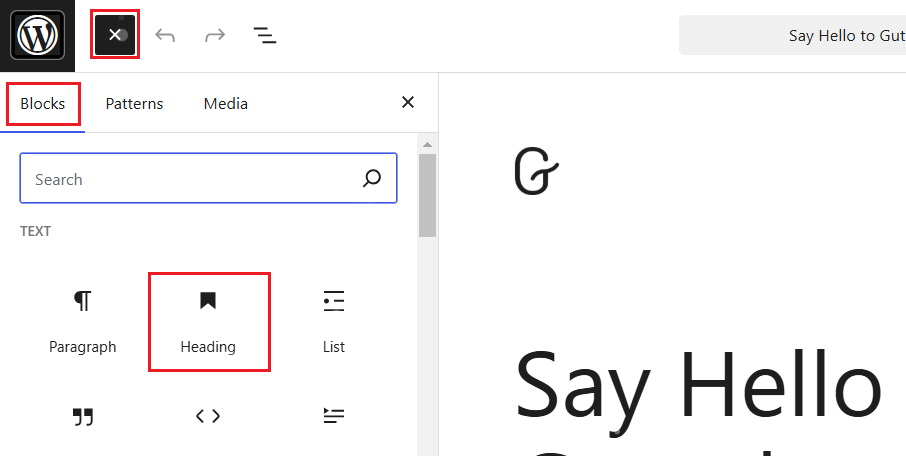
- Type Your Heading: Click inside the heading block and type the text for your heading.
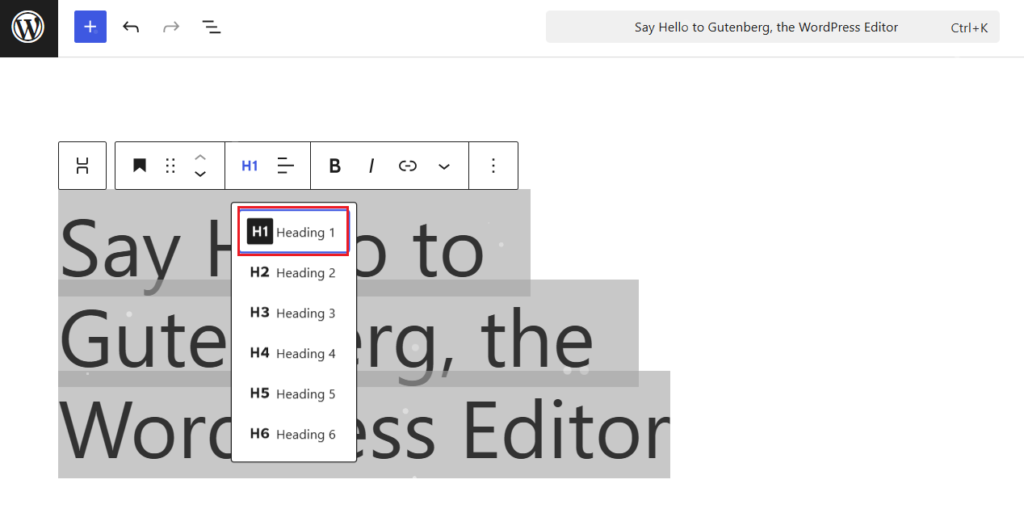
- Choose the Heading Level: Use the toolbar that appears above the block to select the appropriate heading level (H1, H2, H3, etc.).
- Adjust Settings if Needed: On the right-hand settings panel, you can modify additional options, such as dimensions, colors, borders, etc., to match your design preferences.
Now, move on to the second method.
Method #2: Transforming Another Block into a Heading
The Gutenberg editor allows you to quickly convert an existing text block, such as a paragraph, into a heading. This feature saves time and helps you reorganize your content without the need to retype or create new blocks. It’s a convenient way to adjust your layout and make your content more structured.
Steps to Transform a Block into a Heading:
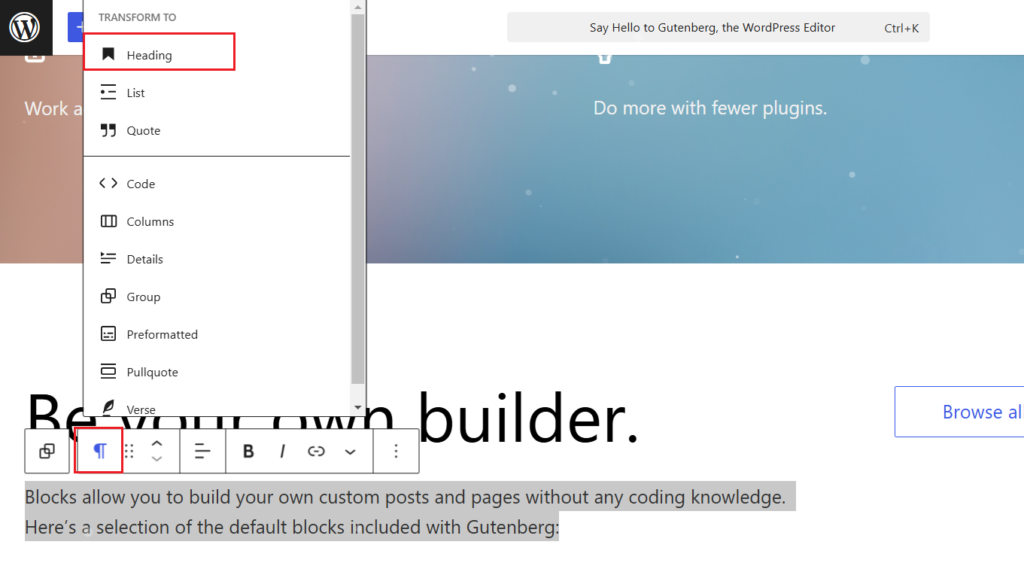
- Select the Text Block: Click on the block you want to convert, such as a paragraph or any other text block.
- Access the Transform Options: In the block toolbar that appears above, click the “Transform to” button.
- Choose the Heading Option: From the dropdown menu, select “Heading” to change the block type. The text now appears as a heading.
- Adjust the Heading Level: Use the toolbar or settings panel to pick the appropriate heading level (H1, H2, H3, etc.).
With these steps, you can efficiently turn any text block into a heading, making it easy to modify your content structure as needed.
Method #3: Use a Keyboard Shortcut
For those who prefer using the keyboard, WordPress offers a quick and efficient way to add headings without relying on menus or mouse clicks. This method is ideal for maintaining your workflow while typing, allowing you to transform a block into a heading in seconds. Additionally, you can use specific characters to create headings of different levels directly within the editor.
Steps to Use a Keyboard Shortcut:
- Activate the Block: Click inside the text block you want to convert into a heading.
- Enter the Shortcut: Type /heading directly in the block, then press Enter to instantly transform it into a heading block.
- Use the Hash Symbol for Headings: Alternatively, type the hash symbol (#) followed by your heading text to create a specific heading level:
- ## for an H2 tag.
- ### for an H3 tag.
- ###### for an H6 tag.
With these shortcuts, you can quickly add or modify headings while staying focused on your content, making the editing process faster and more intuitive.
Best Practices for Working with WordPress Heading Tags
When working with heading tags in WordPress, following best practices helps maintain a well-structured page that is both user-friendly and optimized for search engines. Below are some key guidelines for using heading tags effectively.
– Use One H1 Tag Per Page
Typically, a page should have only one <h1> tag, usually for the main heading or title. This helps search engines understand the primary focus of your page.
– Stick to Logical Heading Hierarchy
Follow a clear structure by using heading tags in the correct order. Start with <h2>, followed by <h3>, <h4>, and so on. Avoid skipping levels, as this can confuse both users and search engines.
– Incorporate Keywords in H2 Tags
Including relevant keywords in your <h2> tags can improve your SEO. While you don’t need to match keywords exactly, Google scans these headings for keyword relevance when ranking content.
– Avoid Long Sentences in Headings
Headings should be concise and to the point. Avoid using entire sentences or paragraphs in your headings. Keeping them short and clear makes them easier to read and more effective for SEO.
– Use Unique Keywords for Each Page
Avoid using the same heading keywords across multiple pages on your site. Unique headings help differentiate your pages and make it easier for search engines to categorize your content.
– Use CSS for Styling, Not Heading Tags
Do not use heading tags solely for styling purposes. If you want to emphasize specific elements on your site, use CSS for design adjustments instead of misusing heading tags.
By following these best practices, you can create well-structured, SEO-friendly content that enhances both user experience and search engine visibility.
💡Want to change the font size using Gutenberg Editor? Read this 👉 How to Change Font in WordPress Block Editor [3 Easy Methods]
Final Remarks
WordPress heading tags give your content structure, improve readability, and boost SEO performance. By using them effectively, you guide readers through your content and help search engines understand its key points. Whether you add headings with the Gutenberg editor, transform blocks, or use keyboard shortcuts, WordPress makes the process simple and efficient.
Properly using heading tags makes your content more engaging and easier to navigate. They also highlight essential keywords, improving your chances of ranking higher in search results.
How do you use heading tags in your WordPress content? Share your thoughts or tips in the comments below—we’d love to hear from you!
Frequently Asked Questions
What are the heading tags in WordPress?
Heading tags in WordPress are HTML elements that define the structure and hierarchy of your content. They range from <h1> to <h6>, with <h1> being the most important and <h6> the least.
How do I add title tags in WordPress?
You can add title tags in WordPress by editing the SEO settings of your page or post using an SEO plugin like Yoast or Rank Math. These plugins let you define custom title tags that appear in search engine results.
How do I add a header tag in WordPress?
To add a header tag in WordPress, use the Gutenberg editor. Insert a “Heading” block, type your text, and select the appropriate heading level (H1, H2, H3, etc.) from the toolbar.
What are the 6 heading tags?
The six heading tags are <h1>, <h2>, <h3>, <h4>, <h5>, and <h6>. These tags define the importance of headings in your content, with <h1> being the most prominent.
Where is H1 in WordPress?
In WordPress, the <h1> tag is usually applied automatically to the title of your post or page. You can verify this in the page source code or customize it in your theme settings if needed.
What are H1, H2, H3, H4, H5, and H6 tags in HTML?
In HTML, H1 through H6 tags represent headings of varying importance. <h1> is for the main title, while <h2> through <h6> create subheadings in decreasing order of importance.

![How to Use WordPress Heading Tags [H1, H2..] How to Use WordPress Heading Tags](https://www.wpdisc.com/wp-content/uploads/2024/12/how-to-use-wordpress-heading-tags-1024x520.png)
![How to Have 2 Lines of Text in WordPress Header [5 Easy Ways] How to Have 2 Lines of Text in WordPress Header [5 Easy Ways]](https://www.wpdisc.com/wp-content/uploads/2025/02/how-to-have-2-lines-of-text-in-wordpress-header-1024x520.png)

![How to Clone My Website to a Second URL [9 Easy Steps] How to Clone My Website to a Second URL [9 Easy Steps]](https://www.wpdisc.com/wp-content/uploads/2025/01/how-to-clone-my-website-to-a-second-url-1024x520.png)
Leave a Reply