In this WordPress Full Site Editing Tutorial, we will create a website with full site editing from start to finish.
But first a little background of what WordPress Full Site Editing is.
WordPress Gutenberg full site editing lets you use Gutenberg blocks to edit any part of the website, not just the content area.
Previously, you could only use Gutenberg blocks when adding content to posts and pages. Plus, the Gutenberg editor wasn’t as intuitive as page builders like Elementor.
Like, for example, the Gutenberg editor didn’t allow you to see a live preview of how your website will look on the front end. What you saw on the editor was very different from what it looked on the front end.
Besides this limitation, you also couldn’t use Gutenberg blocks to edit template parts of your website like the header and footer. If you wanted to change the footer beyond what was allowed in the theme, you had to edit PHP template files.
Enter WordPress Gutenberg full site editing that allows you to edit any part of your website, not just the content area, with Gutenberg blocks.
So, if you are using a block-based theme that supports full site editing, you can use the blocks that are shipped with the theme to design your website from scratch without getting into any code.
For developers, it means faster website editing as editing websites doesn’t require any coding at all.
For the community, it means more earning opportunities as the WordPress Gutenberg full site editing is still a new technology and there is a massive gap in support from theme developers.
For website owners and marketers, it means a new improved technology that will solve all performance-related woes. If you want a good score in Google core web vitals, it’s time to switch from a traditional page builder to WordPress Gutenberg full site editing.
For now, we’ll focus on how to build a website with WordPress Gutenberg full-site editing.
Let’s look at WordPress Gutenberg Full Site Editing More Closely.
Let’s dive in deeper and see the different components that are included in WordPress Gutenberg full site editing.
Here are a few components that are now part of Full Site Editing in WordPress.
Blocks in WordPress Gutenberg
In WordPress Gutenberg, your site is built using various blocks. These blocks are versatile elements you can mix and match to create pages. Customization is key – you can edit existing blocks or create your own. Additionally, you can enhance your site with animated sections or other features by downloading third-party blocks from the block directory. It’s as simple as installing the block you need.
Block Patterns
Block Patterns take this a step further. They’re essentially pre-arranged combinations of different blocks. You can craft your patterns for consistent design across your site or download third-party patterns. This capability has been a game-changer in the WordPress community, fostering creativity and efficiency.
Template Parts
With Gutenberg’s full-site editing, managing template parts like headers has become more straightforward. Gone are the days of editing PHP template files. Now, you can directly edit and create new template parts within the WordPress editor, streamlining the design process significantly.
Site Editor
The Site Editor is a pivotal feature for block-based WordPress themes. It replaces the traditional WordPress Customizer and offers a page builder-like experience. If you’re familiar with plugins like Elementor, you’ll find the Site Editor interface quite intuitive. While there’s a learning curve, it’s not steep for those already accustomed to page builders.
List View
If you are familiar with Elementor or any other page builder, you will know how handy those navigation panels are. List View is a handy component that lets you see the layout with the blocks listed in a hierarchical view. This makes editing a breeze.
Why Use WordPress Gutenberg Full Site Editing instead of a Page Builder?
Exploring WordPress Gutenberg Full Site Editing goes beyond just keeping up with new technology. It offers significant advantages over traditional page builder plugins, making it a worthwhile consideration for anyone looking to enhance their website’s functionality and efficiency.
Here are the advantages of using Gutenberg Full Site Editing over a traditional page builder.
Enhanced Performance
Gutenberg excels in performance, a critical factor especially after Google’s recent emphasis on site speed for rankings. Unlike Elementor, which often loads numerous components regardless of their use, Gutenberg’s block-based architecture ensures that only the necessary blocks are loaded. This approach results in a smaller DOM size and, consequently, faster website performance.
Improved SEO Potential
For website owners, Gutenberg’s efficiency can significantly boost your site’s SEO. A faster site not only ranks better but also provides a superior user experience, which is crucial for retaining visitors and reducing bounce rates.
Native Integration
Gutenberg is integrated into WordPress core, ensuring better compatibility and performance. It’s designed to work seamlessly with WordPress, reducing the risk of conflicts that can occur with third-party page builders.
Reduced Plugin Dependency
By using Gutenberg, you minimize the need for additional plugins. Fewer plugins mean a lighter, faster website and less maintenance in terms of updates and compatibility checks.
Streamlined Workflow
Gutenberg’s block-based approach simplifies the content creation process. It offers a more intuitive and consistent experience across your entire site, from posts and pages to headers and footers.
Consistency and Efficiency
The use of blocks and block patterns promotes design consistency. You can reuse these patterns across your site, ensuring a uniform look while saving time.
Flexibility and Customization
Gutenberg allows for easy customization of layout and design without the need for extensive coding knowledge. This flexibility is particularly useful for users who prefer a more hands-on approach to site design.
Cost-Effective
Unlike some page builder plugins that require premium subscriptions for full functionality, Gutenberg is entirely free, making it a cost-effective solution for building and managing a website.
Future-Proofing
As Gutenberg is part of WordPress core, it’s continuously updated and improved by the WordPress team. Staying with this editor ensures that you are in line with the latest WordPress developments.
Let’s begin this WordPress Full Site Editing Tutorial with a walk-through of the interface.
Interface of the Full Site Editor in WordPress
For starters, you need a theme compatible with WordPress Gutenberg full site editing to be able to take full advantage of the FSE features.
Once you have installed your theme and activated it, go to the admin dashboard and navigate to Site Editor in the Appearance tab.
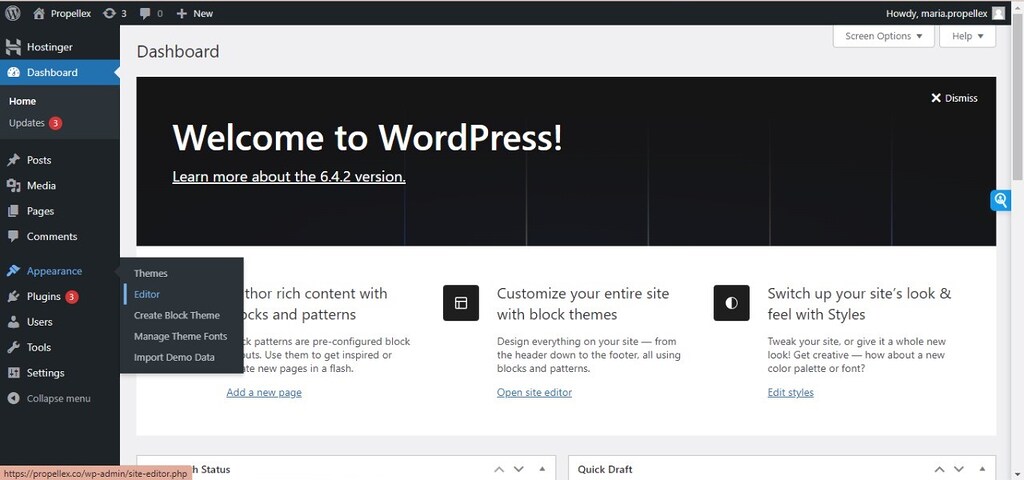
Site Editor only appears in modern themes built for full site editing. If you are using a traditional theme, you won’t see the Site Editor feature.
In the Site Editor, you can customize the style of your website including the header, footer, colors, typography, etc. All of those capabilities that were in Customizer can be done in Site Editor. Plus, it opens new possibilities as you can drag and drop and add new content freely.
Let’s see what the interface of the site editor looks like.
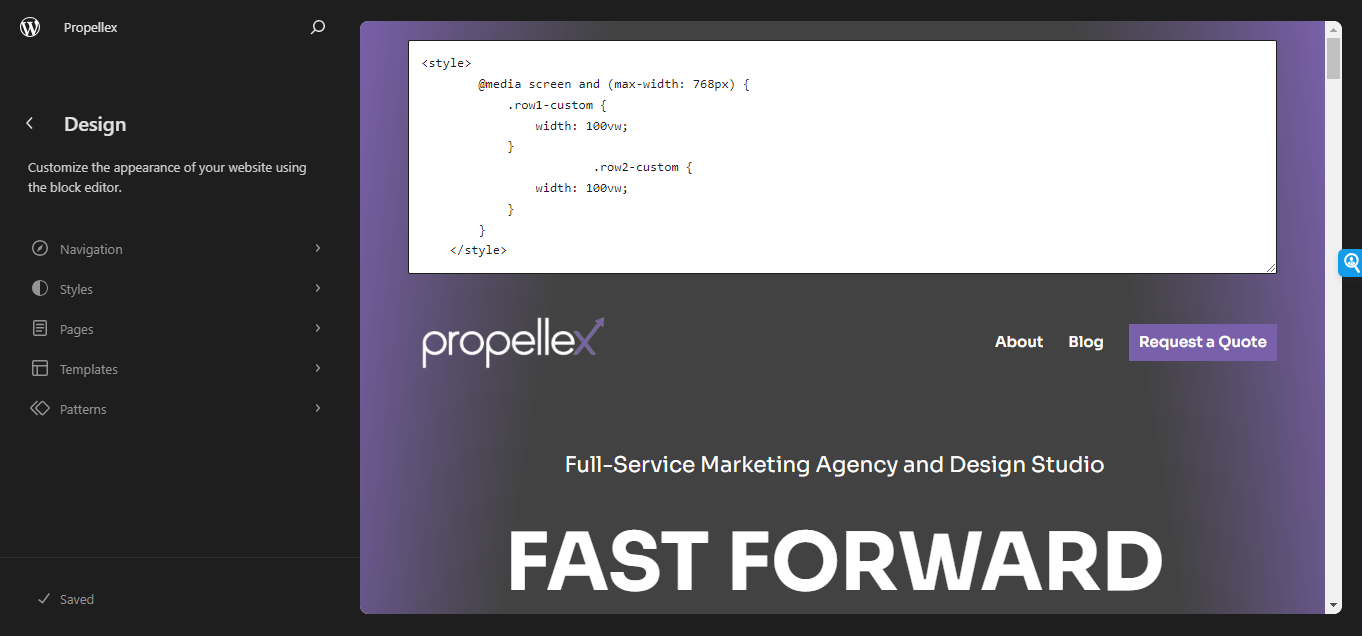
Here, you can see the canvas which has the navigation menu on the left side. Let me explain all the options here so you’ll know how to navigate the site editor.
- Navigation: This is where you’ll find options related to the menu. You can add new menus, edit your menu, assign menu locations, and more.
- Style: This is the place to edit global styles. You can change global typography, logo, website colors, etc.
- Pages: Here, you’ll find the list of pages that you can edit. You can also create new pages.
- Templates: This is where you’ll find the template like single page, post, archive, etc. You can also create custom templates here.
- Patterns: Here, you’ll find the block patterns that come with your theme as well as your template parts. You can create new template parts here as well as import external JSON pattern files.
In the following sections of this WordPress full site editing tutorial, I am going to build a complete website walking you through each step so you can follow along and learn WordPress full site editing with a real-life project.
WordPress Full Site Editing Tutorial
Step 1: Install a WordPress Block Theme that Supports Full Site Editing
To begin with, we need a block-based theme that supports full-site editing.
Here is another post we wrote on the best full-site editing themes in WordPress.
For the purpose of this tutorial, we’re using the Prime FSE theme, which gets shipped with plenty of ready blocks to use.
WordPress Full Site Editing Tutorial
Step 2: Apply Global Styles to WordPress Website with Full Site Editing
Before we edit anything, let’s customize our website with our brand colors and typefaces.
To do that, navigate to Editor and then go to Styles.
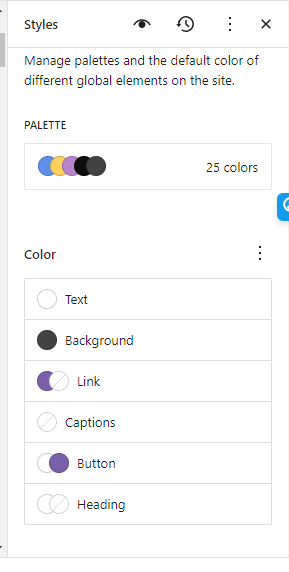
Here you’ll see the global styling options in the right panel.
You can change the layout of the website, colors, typography, button styles, and more here in the style editor.
You can add your brand colors to the theme palette and customize the colors of text, headings, links, and buttons.
Changing the typography, however, requires some workaround as you can only choose what fonts are included in your theme.json file. To add your own custom font, you need to load that font by adding some code in theme.json.
However, WordPress has rolled out a pretty cool plugin called Create Block Plugin that allows you to add custom fonts without coding. Here is the tutorial on how to add custom fonts in block themes.
Global styles also allow you to edit your theme blocks. The customizations you make here will apply to all blocks sitewide. For example, if you customize the image block here, it will apply to all image blocks across the website.
Now, that you have customized the brand colors, typography and container size, let’s go ahead and change the site logo, which can be done by editing the Site Logo Block.
To change the site logo, navigate to Styles and then in the right panel, scroll down to the option of blocks.
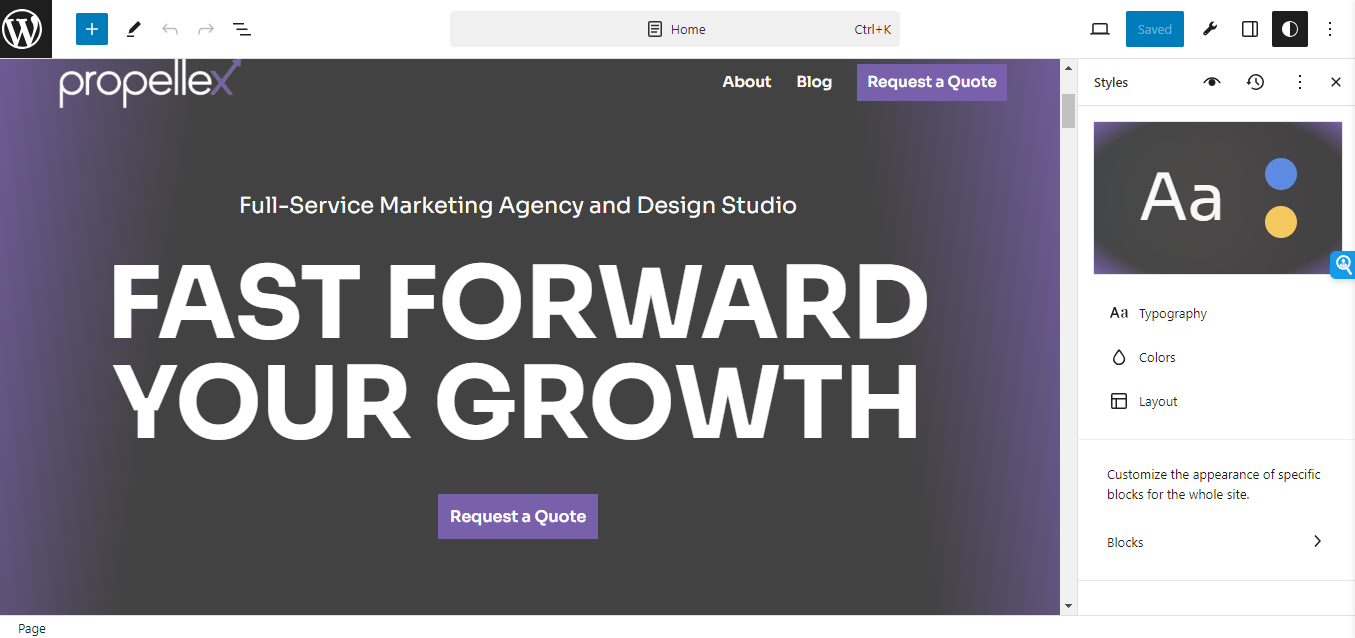
Search for the Site Logo block and click to edit. You can now replace the logo image here.
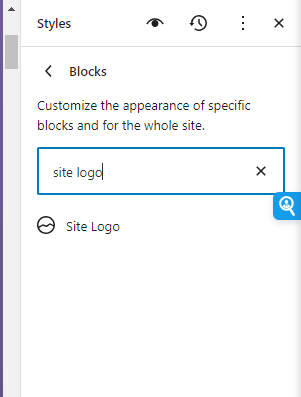
If you are having an issue with the Site Logo block not letting you upload an image, it might be because of a conflict with a caching plugin. Disable the caching plugin temporarily and then try replacing the site logo.
Note that the latest WordPress version has an issue with the Site Logo block. It tends to conflict with other plugins and doesn’t let you upload an image. If this happens, disable all plugins one by one and see if it’s working.
WordPress Full Site Editing Tutorial
Step 3: Edit Template Parts in WordPress Full Site Editing
With your website styling done, let’s move on to edit the template parts of your website.
Thanks to the block-based architecture of WordPress and full site editing feature, editing the template parts no longer requires you to edit PHP template files.
With the full site editor, everything is customizable and you can easily edit any template part like header, footer, archive, single post, and other templates with Gutenberg blocks.
To start, navigate to Editor in the Appearances tab.
In the navigation panel, go to Patterns. Here you’ll see the available patterns that come with your theme and also your template parts.
For the sake of an example, let’s edit the header. Click Header to open the header styles available with your theme.
The Prime FSE theme comes with a plugin that activates the Mega Menu. Hence, there are 2 header types. Since I want the header with Mega Menu, I’ll select that for editing.
When you click the header style you prefer, it lets you edit the header template part using Gutenberg blocks.
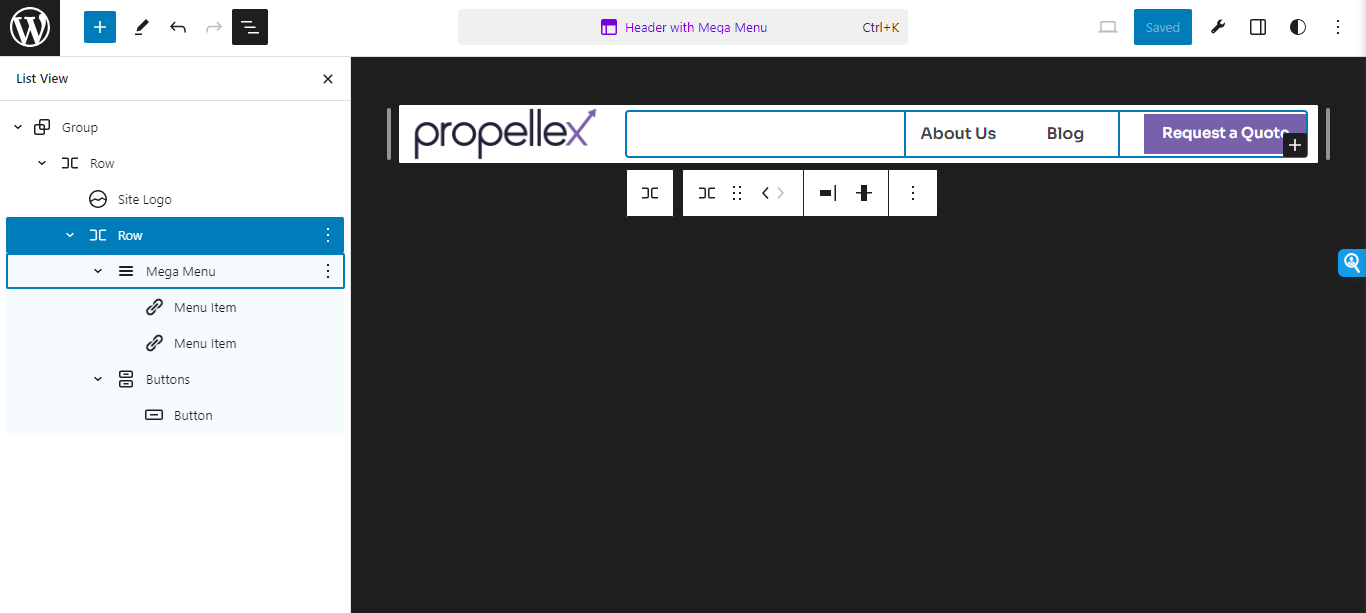
Open the list view to see the blocks and how they are nested. If you want, you can start from scratch and build your own header using all the blocks that come with your theme.
Here, I am aligning things a bit, changing the text of the header button, and also removing the background color of the header as I want it to be transparent.
Here is another WordPress full site editing tutorial on how to design a responsive header.
WordPress Full Site Editing Tutorial
Step 4: Editing Pages
For the sake of this tutorial, let’s edit the home page. I created a page titled Home in the Pages tab.
In the reading settings, I assigned the new page to be the static front page.
With this done, I navigate to Site Editor > Pages and click the Home page to edit.
Here, I can set the layout structure and use the numerous blocks that my theme comes with to design the Home Page.
This is what the Page Editor looks like.
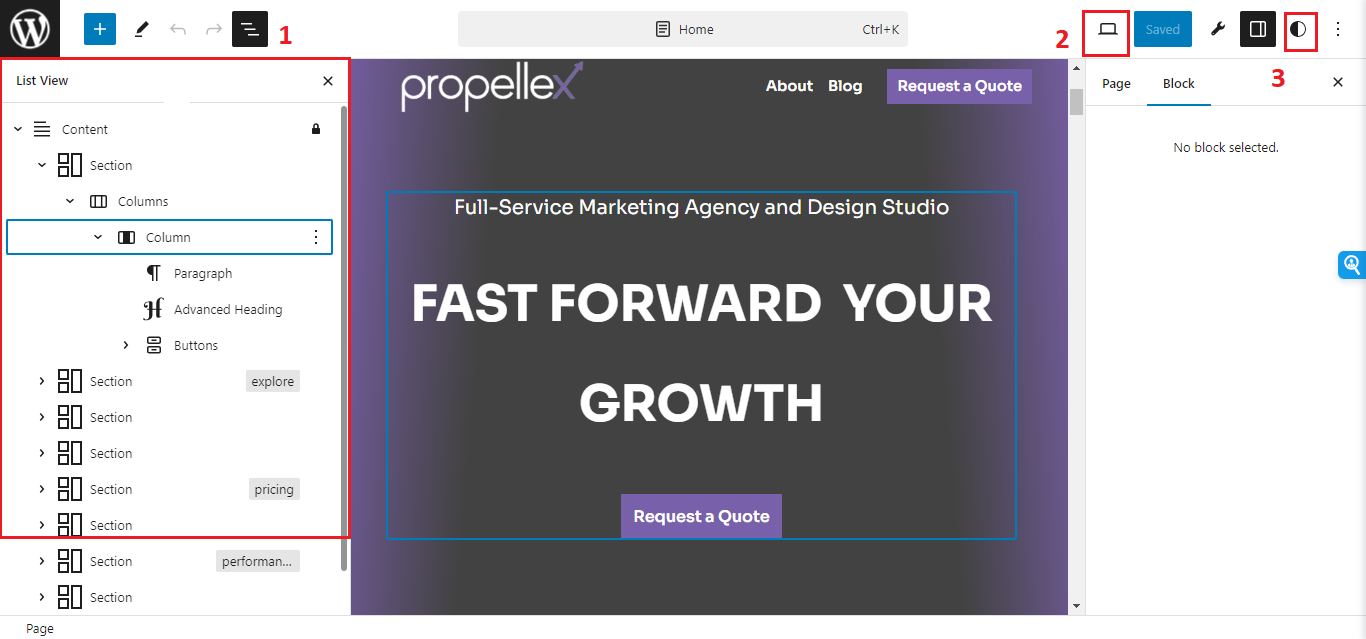
- List View: This is the button to open up the list view option. You can view the different blocks on your page and edit them.
- Responsive View Toggle: This is where you can view your page like it would appear on different devices while editing.
- Global Styles: This is the style option that lets you edit the global styles while working on your page.
In the above screenshot, you can see the panel on the right where it says ‘no block selected.’
These options will appear when you select a block on the page to edit.
WordPress Full Site Editing Tutorial
Step 5: Editing Page Templates
So far, we have learned how to customize global styles, template parts, and pages. In this step of the WordPress full site editing tutorial, let’s look at page templates and how to edit them.
For the purpose of this WordPress full site editing tutorial, let’s edit the blog template.
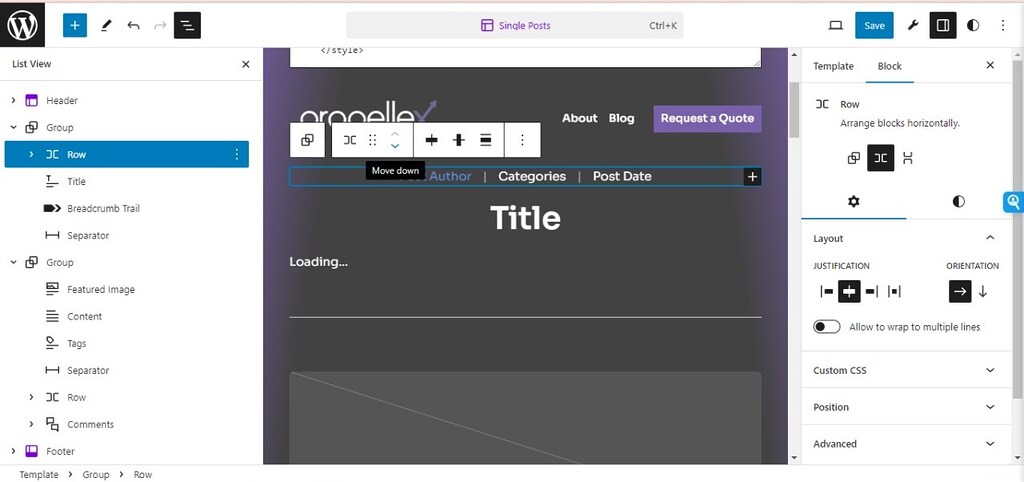
To begin, navigate to Editor > Templates and click Single Posts to edit the Blog Post template.
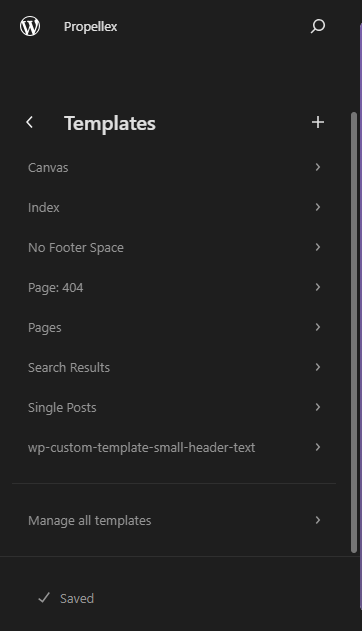
Open the list view to see the blocks and patterns.
If I want, I can delete the header from this template or change the header to a different header. That way, a different header will appear on all blog posts.
For the purpose of illustration, I am changing the order of ‘post info’ on this default blog post template and moving it beneath the post title.
Wrapping it up…
And that’s pretty much it. This WordPress Full site editing tutorial will only get you started. But when you do get your hands dirty with full site editing in WordPress, you’ll definitely come across specific problems and nuances. If you need any guidance, drop a comment in the comment section. We’ll try to solve the problem and write a post on it!

![How to Have 2 Lines of Text in WordPress Header [5 Easy Ways] How to Have 2 Lines of Text in WordPress Header [5 Easy Ways]](https://www.wpdisc.com/wp-content/uploads/2025/02/how-to-have-2-lines-of-text-in-wordpress-header-1024x520.png)

![How to Clone My Website to a Second URL [9 Easy Steps] How to Clone My Website to a Second URL [9 Easy Steps]](https://www.wpdisc.com/wp-content/uploads/2025/01/how-to-clone-my-website-to-a-second-url-1024x520.png)
Leave a Reply