Dealing with image upload issues in WordPress can be a real headache, especially if you’re trying to maintain a smooth workflow. One minute, everything works perfectly, and the next, your media library refuses to accept new images, leaving you puzzled and frustrated.
If you’ve encountered this issue, you’re not alone. Many WordPress users face these challenges. Thankfully, there are simple solutions to resolve these problems and get you back on track quickly.
In this guide, we’ll explore ten practical methods to tackle the image upload issue in WordPress. From common glitches to more elusive issues, we’ll cover everything you need to know to regain control of your media uploads.
Ready? Let’s get started!
What Are The Reasons Behind the Image Upload Issue in WordPress?
When images are unable to upload in WordPress, several factors could be causing the issue. Let’s break down the most common reasons:
- Browser Compatibility Issues: Different browsers manage file uploads in unique ways. While one browser might process your image without trouble, another might struggle due to compatibility differences. Switching browsers can sometimes highlight or resolve the issue.
- Invalid File Names: File names with special characters, spaces, or unusual symbols can trigger upload errors. WordPress prefers clean file names using only letters, numbers, and dashes, so always keep file naming conventions simple.
- Cached Data Problems: An outdated cache can interfere with WordPress functionality, including image uploads. Clearing your browser or site cache often resolves these conflicts and restores normal upload functionality.
- Plugin Conflicts: Certain plugins can disrupt the image upload process. A plugin’s features or settings might clash with WordPress’s default functions, causing unexpected errors. Temporarily deactivating plugins can help identify if one of them is behind the issue.
- Theme-Related Errors: Themes that are poorly coded or incompatible with the latest WordPress updates can interfere with uploads. If you suspect your theme is causing problems, try switching to a default WordPress theme and testing the uploads again.
- Incorrect File Permissions: When WordPress doesn’t have permission to write to your uploads folder, errors occur during the upload process. Adjusting file permissions on your server can fix this problem and allow WordPress to handle uploads correctly.
- Memory Limit Restrictions: Hosting providers set memory limits for websites, and if your site exceeds these limits, large image files might fail to upload. Increasing the memory allocated to your WordPress site often solves this issue.
By addressing these potential causes, you can identify the root of the problem and restore your ability to upload images without interruptions.
10 Effective Methods to Fix Image Upload Issue in WordPress
Now that you understand the common causes behind image upload issues in WordPress, it’s time to tackle the problem. Here are ten effective methods to fix the issue and get your site running smoothly again:
- Reload the Page or Use a Different Browser
- Upload the Image via the Media Library
- Rename the Image File
- Clear Your Website Cache
- Identify Plugin or Theme Conflicts
- Modify File Permissions
- Increase Your PHP Memory Limit
- Use the Browser Uploader
- Switch Browsers
- Verify Your PHP Version
Ready? Let’s get started.
Method #1: Reload the Page or Use a Different Browser
Sometimes, reloading the page is all it takes to fix the image upload issue in WordPress. While it might seem like a basic solution, it often resolves the problem quickly.
One possible reason for the issue is an expired login session. If this happens, refreshing the page or switching back from another tab may log you out, prompting you to log in again. Once you’ve re-logged, try uploading the image again.
Another common cause is a temporary loss of connection between WordPress and your browser. This could result from a brief internet outage or a hiccup on your WordPress hosting server. Reloading the page and attempting the upload again often resolves this type of error.
Sometimes, the problem lies with your browser. Switching to a different browser can help you determine if the issue is browser-specific. Trying another browser may allow the upload to go through without any complications.
Method #2: Upload the Image via the Media Library
If reloading the page or switching browsers doesn’t solve the issue, try uploading the image directly through the Media Library. This method often bypasses errors encountered during uploads within posts or pages.
To do this, navigate to the WordPress dashboard and go to Media » Add New Media File. From there, click on Select Files and choose the image you want to upload.

Uploading through the Media Library allows WordPress to handle the file without the additional processes involved in the post or page editor. In many cases, this simple step resolves the problem.
Method #3: Rename the Image File
File names play a significant role in the image upload process. If your image file name contains spaces or special characters like #, !, or @, WordPress might reject it. These characters can cause problems because some web servers and browsers don’t handle them properly.
To resolve this, rename your file to a simple, clean name using only letters, numbers, and dashes. For example, instead of naming the file my image #1!.jpg, you can rename it to my-image-1.jpg.
Using easy-to-understand file names not only prevents upload errors but also helps maintain better organization for your media files. Before reuploading, check the file name and make the necessary adjustments to avoid this issue in the future.
Method #4: Clear Your Website Cache
An outdated cache is a common culprit behind image upload problems in WordPress. While caching speeds up your site by storing copies of content, it can sometimes create conflicts. A stale or corrupted cache might block new uploads from being recognized or processed properly.
To fix this, start by clearing your site’s cache. If you use a caching plugin like WP Rocket, access its settings to refresh the cache. Many hosting providers also offer cache-clearing options in their control panels, making the process simple.
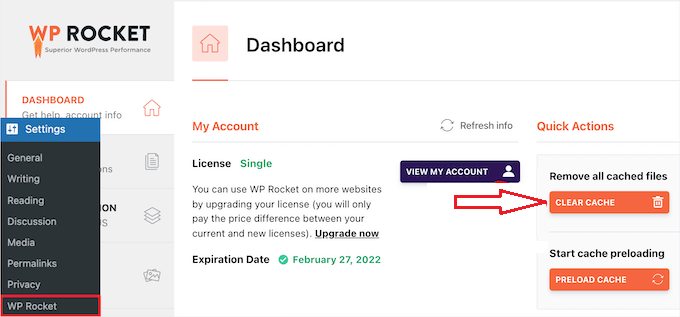
Next, clear your browser cache. Browsers store copies of web pages, including images, to improve loading speeds. However, an outdated browser cache can interfere with new uploads. To clear it, open your browser’s settings, locate the option to clear browsing data, and remove the cached files.
After clearing both caches, try uploading the image again. This often resolves the issue and allows your site to function without any interference from old data.
Method #5: Identify Plugin or Theme Conflicts
Plugins or themes can sometimes interfere with the image upload process in WordPress. These conflicts often arise when a plugin or theme is outdated or incompatible with the latest WordPress version or other installed tools. Troubleshooting these conflicts can help resolve the issue.
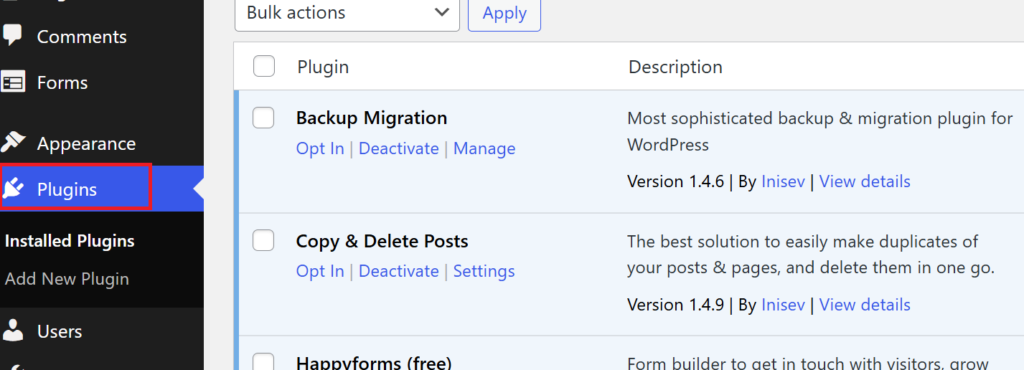
Start by deactivating all plugins. Go to the Plugins section in your WordPress dashboard and deactivate them one by one or all at once.
Then, switch to a default theme like Twenty Twenty-One. To do this, navigate to Appearance > Themes and activate a default option.
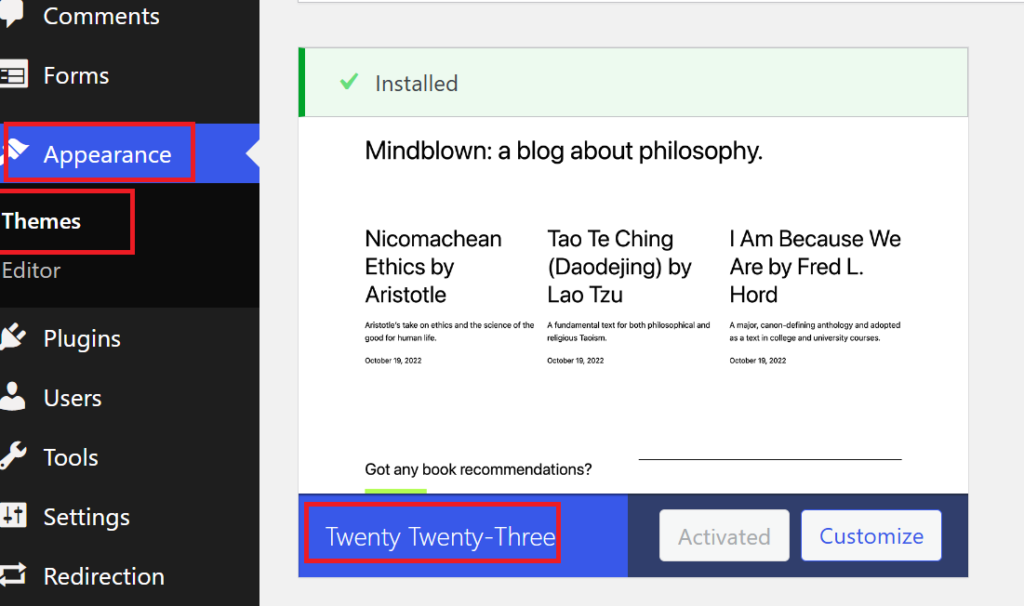
After these steps, try uploading the image again. If the upload works, the issue lies with one of your plugins or your previous theme.
To identify the exact cause, reactivate your plugins one at a time. After reactivating each plugin, test the image upload. If the problem returns after activating a specific plugin, you’ve found the source of the conflict. Look for an alternative plugin or contact its developer for support.
If reactivating plugins doesn’t solve the issue, the problem might stem from your theme. Reach out to the theme developer for assistance or consider switching to a different theme.
Method #6: Modify File Permissions
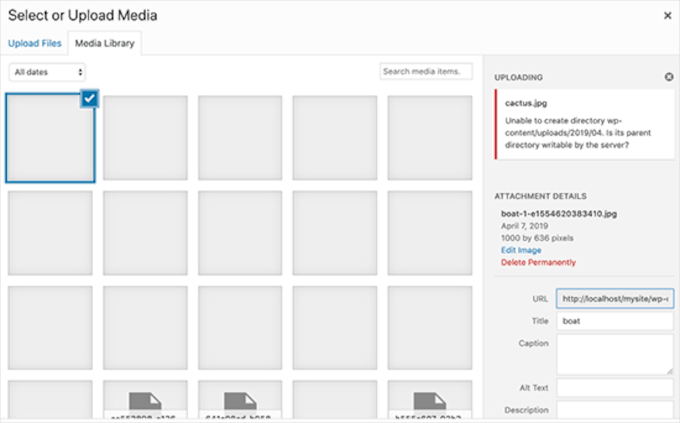
Incorrect file permissions can also lead to image upload issues in WordPress. Your WordPress files reside on your hosting server and require specific permissions to function correctly. When file permissions are misconfigured, WordPress might fail to upload or read files. You could encounter errors like:
- “Unable to create directory wp-content/uploads/2023/12. Is its parent directory writable by the server?”
- “The uploaded file could not be moved to wp-content/uploads/.”
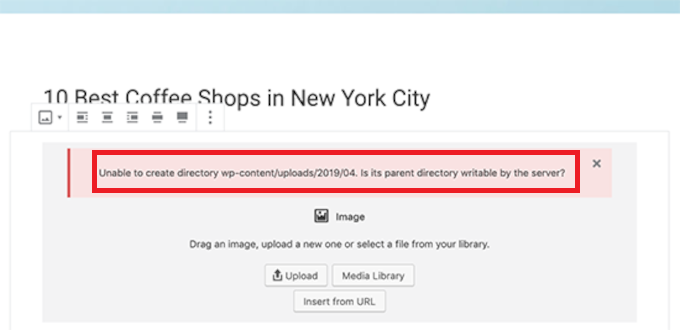
In some cases, images might even disappear from your media library, signaling a permissions problem.
What Causes File Permissions to Change?
File permissions can change due to several reasons. Hosting server upgrades or misconfigurations on shared hosting accounts are common culprits. Even if you haven’t made any changes yourself, these events can reset permissions unexpectedly.
The good news is you can fix this issue by manually correcting the file permissions.
Steps to Change File Permissions
To modify file permissions, you’ll need an FTP client like FileZilla. Follow these steps:
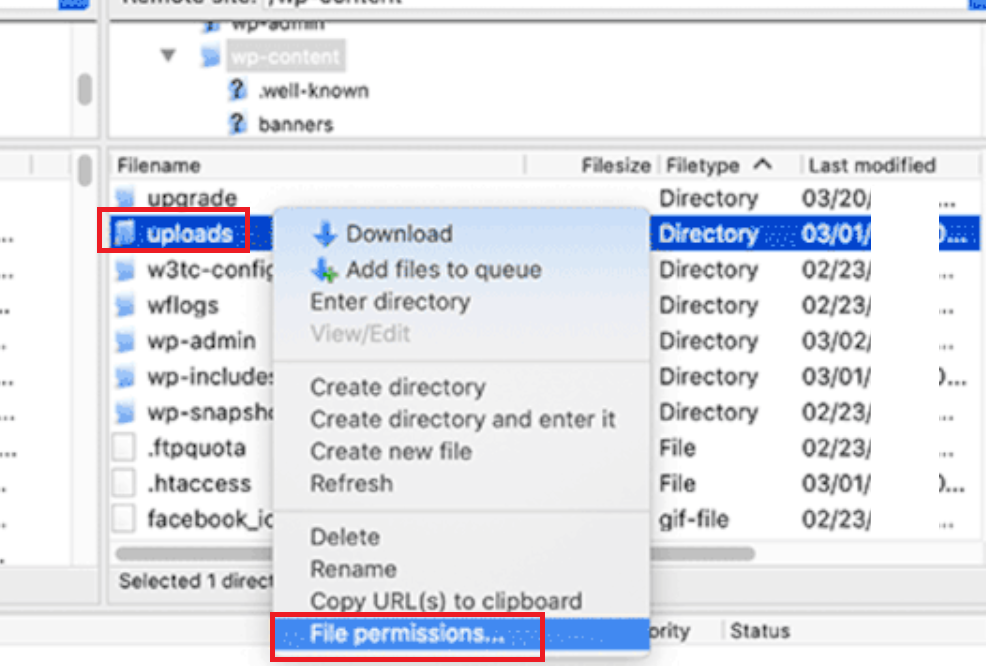
- Connect to Your Site via FTP: Open your FTP client and connect to your website. Navigate to the /wp-content/ folder and locate the uploads directory, where WordPress stores all media files.
- Adjust Directory Permissions:
- Right-click on the uploads folder and choose File permissions from the menu.
- In the permissions dialog box, set the numeric value to 744.
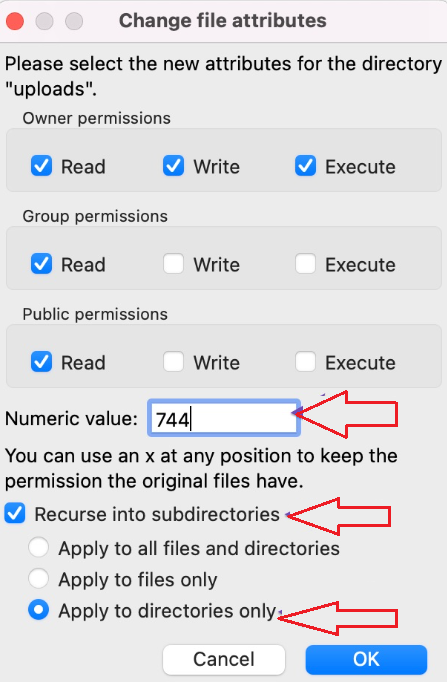
- Check the box for Recurse into subdirectories and select Apply to directories only.
- Click OK to apply the changes. The FTP client will update the permissions for the folder and its subdirectories.
- If the issue persists, try changing the directory permissions to 755 instead.
- Set File Permissions:
- Next, right-click the uploads folder again and choose File permissions.
- Set the numeric value to 644 in the dialog box.
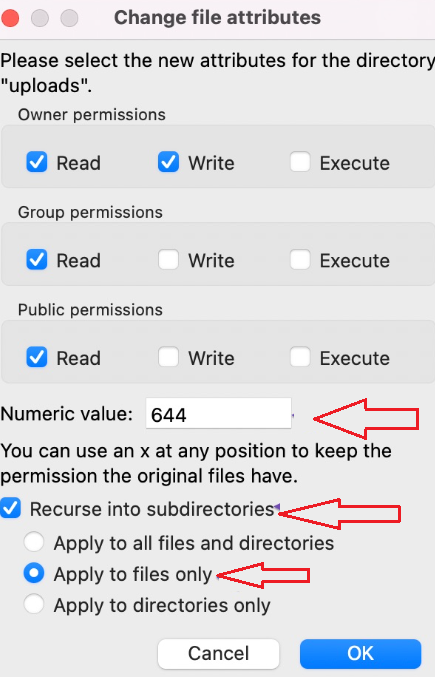
- Check the box for Recurse into subdirectories and select Apply to files only.
- Click OK to apply the changes to all files inside the folder.
Once you’ve updated the file and directory permissions, return to your WordPress admin dashboard and try uploading the image again. If your website includes file upload forms, test those to confirm everything works properly.
This method might seem technical, but it often resolves file permission issues and restores the ability to upload images and even it fixes the white screen of death issue in WordPress.
Method #7: Increase Your PHP Memory Limit
If WordPress struggles to process an image upload, the issue could stem from insufficient memory. Your website requires a certain amount of PHP memory to handle tasks, and when this limit is too low, you may encounter errors while uploading images.
Raising the PHP memory limit often resolves this problem. You can follow any of the following options to make the adjustment:
#1: Edit the wp-config.php File
Access your WordPress files through an FTP client or your hosting control panel. Locate the wp-config.php file in your site’s root directory.
Add the following line of code before the line that says /* That’s all, stop editing! Happy publishing. */:
define(‘WP_MEMORY_LIMIT’, ‘256M’);
This change increases your PHP memory limit to 256 MB, which is usually sufficient for most sites.
#2: Contact Your Hosting Provider
If editing files feels too technical or doesn’t resolve the issue, reach out to your hosting provider. Most hosts can quickly adjust the PHP memory limit for you.
#3: Use a Plugin
Alternatively, you can install a plugin like WP Config File Editor to make this change without accessing files directly. The plugin allows you to adjust memory settings through a user-friendly interface.
After increasing the PHP memory limit, try uploading your images again. This method can resolve many upload-related issues caused by memory restrictions.
Method #8: Use the Browser Uploader
If other troubleshooting methods haven’t resolved your issue, the browser uploader offers an alternative way to upload images. While it lacks advanced features like drag-and-drop or multiple file selection, this method provides a straightforward way to upload files when other options fail.
Steps to Use the Browser Uploader
- Access the Media Library: Log into your WordPress dashboard and navigate to Media → Add New.
- Switch to the Browser Uploader: On the Add New page, locate and click the “browser uploader” link. This option lets you upload files directly through your browser.
- Upload Your File: Click Choose File, select the image you want to upload from your device, and then click Upload.

This method bypasses potential conflicts with the standard uploader, making it a useful workaround for quick uploads. After successfully uploading an image with the browser uploader, test the standard uploader again to check if the issue persists.
Using this tool can help pinpoint whether the problem lies with the default uploader or other settings within WordPress.
Method #9: Switch Web Browsers
Sometimes, the issue might not lie with your WordPress site but with the browser itself. Different browsers handle uploads in unique ways, and occasional glitches can prevent a successful image upload.
Users have reported encountering HTTP errors and sometimes the ERR_CONNECTION_RESET error while using certain browsers, like Google Chrome. Switching to another browser, such as Firefox, Edge, or Safari, can help you determine if the issue is browser-specific.
- Try a Different Browser: Open your website in an alternative browser and attempt to upload the image again.
- Analyze the Results: If the upload works, the issue likely lies with the original browser. In this case, clearing the browser cache or disabling extensions in the problematic browser may resolve the error.
- Seek Additional Support if Necessary: If switching browsers resolves the issue but you prefer your original browser, consider reaching out to the browser’s support team or checking their forums for a fix.
By testing multiple browsers, you can isolate the problem and potentially find a quick solution without making changes to your WordPress setup.
Method #10: Verify Your PHP Version
The version of PHP running on your server plays a crucial role in how WordPress functions, including handling image uploads. Using an outdated PHP version, especially anything below 7, can lead to compatibility issues with newer WordPress features.
WordPress officially recommends PHP version 7.4 or higher for optimal performance and compatibility. Older versions may lack support for modern functionality, leading to errors like image upload issues.
To check your PHP Version, follow the steps below:
- Access the Site Health Tool: Navigate to your WordPress dashboard and go to Tools → Site Health.
- Find Server Details: Switch to the Info tab and expand the Server section. Here, you’ll see the PHP version your server is using.
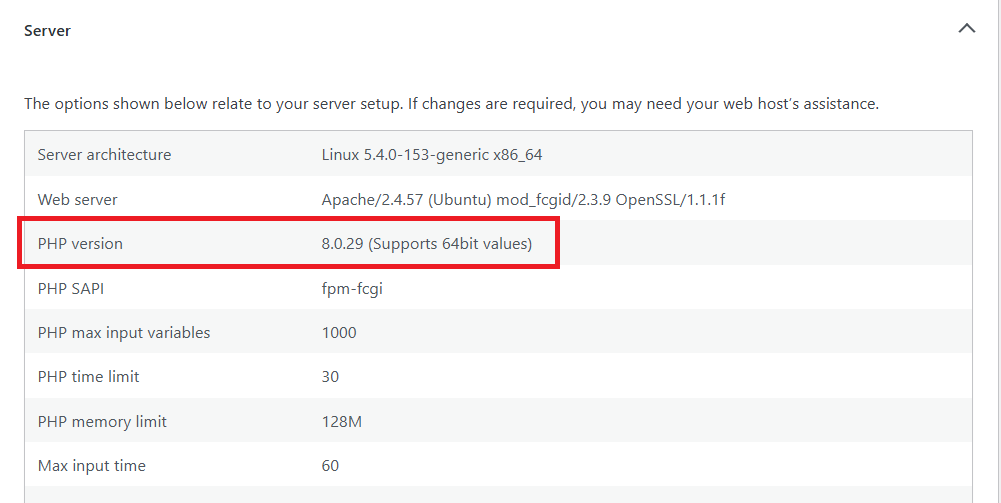
The steps to update your PHP version are as follows:
- Log in to your hosting dashboard and locate the PHP version settings.
- Select a version that is at least 7.4 or higher. Many hosting providers offer one-click options to update PHP.
- Save the changes and restart any necessary services if prompted.
After updating your PHP version, try uploading the image again. A modern PHP environment often resolves compatibility issues and improves overall site performance. If you continue facing errors, contact your hosting support team for further assistance.
Final Remarks — Image Upload Issue in WordPress
Fixing image upload issues in WordPress doesn’t have to be overwhelming. By taking proactive steps and applying the methods in this guide, you can quickly resolve the problem and get back to managing your website with ease.
Key takeaways for fixing WordPress image upload issues:
- Reload the Page or Switch Browsers: Start with a quick refresh or try a different browser to rule out browser-related problems.
- Rename Files and Adjust Permissions: Use clean file names without special characters and correct file permissions if needed.
- Clear Caches: Clear your browser and site caches to eliminate potential conflicts.
- Address Plugin or Theme Issues: Disable plugins or switch themes to identify and fix compatibility problems.
- Update Server Settings: Upgrade your PHP version, increase memory limits, or contact your hosting provider for further support.
These actionable steps help you identify and resolve the root causes of image upload issues in WordPress.
Have you tried any of these methods? Which one worked best for you? Drop your questions or share your experience in the comments below—we’re here to help!

![How to Fix Image Upload Issue in WordPress [10 Effective Ways] How to Fix Image Upload Issue in WordPress](https://www.wpdisc.com/wp-content/uploads/2024/12/image-upload-issue-in-wordpress-1024x520.png)
![How to Have 2 Lines of Text in WordPress Header [5 Easy Ways] How to Have 2 Lines of Text in WordPress Header [5 Easy Ways]](https://www.wpdisc.com/wp-content/uploads/2025/02/how-to-have-2-lines-of-text-in-wordpress-header-1024x520.png)

![How to Clone My Website to a Second URL [9 Easy Steps] How to Clone My Website to a Second URL [9 Easy Steps]](https://www.wpdisc.com/wp-content/uploads/2025/01/how-to-clone-my-website-to-a-second-url-1024x520.png)
Leave a Reply