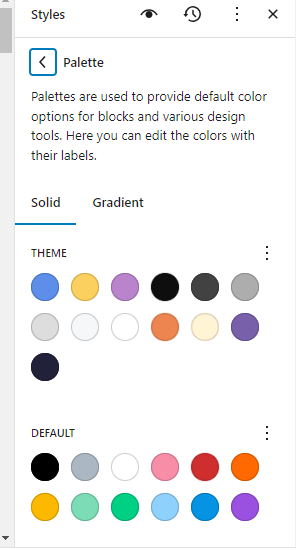
Do you want to know how to make a custom color palette in WordPress so that you can easily maintain your brand identity? If yes, you’re in the right place.
The implementation of custom color palettes in WordPress not only streamlines the application of a brand’s specific colors but also plays a critical role in maintaining brand consistency.
By defining a custom palette, website designers effectively remove other color options from the WordPress editor, narrowing the choices to only those colors that align with the brand’s identity.

This targeted approach significantly reduces the risk of users or content creators inadvertently selecting colors that are off-brand, thereby maintaining a cohesive and consistent visual narrative across the website.
This restriction is particularly beneficial in larger teams or multi-author environments, where different individuals contribute to the site’s content.
With a custom color palette, the chances of deviating from the predefined color scheme are minimized.
It ensures that everyone adheres to the same set of colors, reinforcing the brand’s visual identity in every aspect of the site, from the homepage to individual blog posts.
By eliminating the default, and often overwhelming, array of color choices that come with WordPress, custom color palettes provide a focused and brand-centric approach to site design.
This streamlined selection process not only maintains brand integrity but also simplifies the design process for content creators, allowing them to focus more on content quality and less on design decisions.
The result is a more efficient workflow and a consistently branded digital presence, both of which are crucial for establishing a strong and recognizable online brand.
The introduction of theme.json in WordPress has significantly transformed how these custom color palettes are managed, especially with the advent of Full Site Editing (FSE).
Full Site Editing represents a major shift in WordPress design, offering a more unified and integrated approach to site-building.
In this environment, theme.json plays a crucial role. It acts as a central configuration file where themes can declare their support for various features, including custom color palettes.
With theme.json, theme developers and site owners can define and control settings and styles globally, directly impacting how elements are displayed site-wide.
In this post, we will go through a step by step guide about how to make a custom color palette in WordPress with Theme.JSON file
What is WordPress Theme.json?
theme.json is a configuration file used in WordPress themes that acts as a cornerstone for theme development and customization.
It serves as a centralized control point, allowing theme developers and website owners to manage a wide range of settings and styles across the entire website.
This file is written in JSON (JavaScript Object Notation), a lightweight data-interchange format, which makes it both human-readable and easy to work with.
The true power of theme.json lies in its ability to enable global management of a site’s aesthetic and functional aspects.
Through this file, developers can define settings for various elements like colors, fonts, layout, and block settings.
For instance, when a custom color palette is defined in theme.json, it becomes the standard palette for the entire site, ensuring consistency in color usage throughout.
How to Edit Theme.json File?
Editing the theme.json file in WordPress involves a few straightforward steps, allowing theme developers and website owners to tailor their site’s design and functionality according to their preferences. Here’s how you can access or create a theme.json file in your theme directory:
- Accessing the Theme Directory: Firstly, you need to access your WordPress site’s files. This can usually be done through a File Manager in your web hosting control panel, or by using an FTP client like FileZilla.
- Locating Your Active Theme: Inside the /wp-content/themes/ directory, open the folder for the theme you are currently using or intend to edit.
- Finding or Creating the theme.json File: Look for the theme.json file within your theme’s main directory. If your theme supports Full Site Editing (FSE), it’s likely that this file already exists.
- Editing the theme.json File: Open the theme.json file in a text editor. It’s advisable to use a code editor like Visual Studio Code, Atom, or Sublime Text for better syntax highlighting and error detection. Make your desired changes to the file. You can define or modify settings like color palettes, font sizes, layout configurations, and more.
- Ensure that your JSON syntax is correct. JSON format is very strict about structure, including things like comma placement and quotation marks.
- If you’re using FTP, upload the modified theme.json file back to your theme’s directory on your web server.
Always back up your original theme.json file before making changes, so you can easily revert back if needed.
Step-by-Step Guide of How to Make a Custom Color Palette in WordPress
How to make a custom color palette in WordPress using `theme.json`, while simultaneously turning off the default and custom color options?
Here’s how you can do it:
Defining the Custom Color Palette
Within the `theme.json` file, you’ll define your color palette in the `settings` and `color` sections.
Disabling Default and Custom Colors
To disable the default and custom color options, set both `color.custom` and `color.defaultPalette` to `false`.
Sample JSON Code
Here’s an example of what your `theme.json` might look like with these settings:
    {
"settings": {

        "color": {

          "custom": false,             // Disables custom color picker

          "defaultPalette": false,     // Disables default color palette

          "palette": [                 // Your custom color palette

            {

              "slug": "primary",

              "color": "#0073AA",

              "name": "Primary Blue"

            },

            {

              "slug": "secondary",

              "color": "#005177",

              "name": "Secondary Blue"

            }

            // Add more colors as needed

          ]

        }

      }

    }
Palette Naming and Slugs
- Choose clear, descriptive names for your colors.
- Slugs should be lowercase and use hyphens for separation (e.g., `accent-color`).
Implementing Your Palette
- Insert your custom palette array within the `settings.color.palette` path.
- Save your `theme.json` file after editing.
- Clear any caches and check your WordPress site to ensure the palette is applied and default/custom options are disabled.
By following these steps, you can create a tailored color environment in your WordPress theme, ensuring that only your defined palette is available for use, thereby maintaining consistency in your site’s branding and design.
Applying Changes and Previewing in Gutenberg
- Save and Upload Changes: After editing your theme.json file, save it. If you’re using an FTP client, upload the updated theme.json file back to your theme’s directory on the server.
- Clear Caching: Clear any caches that your WordPress site might be using. This includes your browser cache, WordPress cache (if you’re using a caching plugin), and server-side cache, if applicable.
- Previewing in Gutenberg Editor:
- Go to your WordPress dashboard and navigate to a post or page edit screen.
- Open the Gutenberg editor where you’ll see the color options in various blocks like Paragraph, Button, or Group blocks.
- Check the color settings. Your custom color palette should now replace the default palette, and any custom color options should be disabled if you’ve set them that way.
This step is crucial to ensure that the latest changes are fetched and displayed.
Conclusion: How to Make a Custom Color Palette in WordPress
In summary, using theme.json for custom color palettes in WordPress offers significant benefits for website design and brand consistency. It simplifies the process of applying a cohesive color scheme across your site, ensuring that every element aligns with your brand identity.


![How to Have 2 Lines of Text in WordPress Header [5 Easy Ways] How to Have 2 Lines of Text in WordPress Header [5 Easy Ways]](https://www.wpdisc.com/wp-content/uploads/2025/02/how-to-have-2-lines-of-text-in-wordpress-header-1024x520.png)

![How to Clone My Website to a Second URL [9 Easy Steps] How to Clone My Website to a Second URL [9 Easy Steps]](https://www.wpdisc.com/wp-content/uploads/2025/01/how-to-clone-my-website-to-a-second-url-1024x520.png)
Leave a Reply