Are you wondering how to set up contact form 7? Today, you are in luck! In this guide, we will answer this exact question in detail.
If you want to let your WordPress visitors contact you, then creating a contact is the right thing to do. However, creating a contact from scratch can be daunting.
That’s where Contact Form 7 can help! Contact Form 7 is one of the most user-friendly plugins for creating a contact form.
In this guide, we will show you everything regarding how to set up Contact Form 7, from installing the Contact Form 7 plugin to setting up a custom contact form and even how to use the default form.
Ready? Let’s get started!
What Is Contact Form 7 in WordPress?
Contact Form 7 is a free WordPress plugin that lets you create various contact forms for your website. It allows you to easily create and manage multiple forms and customize each one with a simple markup.

One of the best features of Contact Form 7 is that it’s entirely free. Adding your contact forms to any post, page, or widget area is quick and easy, with custom shortcodes for each form you create.
Among contact form plugins, Contact Form 7 stands out for its simplicity.
Key Features of Contact Form 7 WordPress Plugin:
- Form Tag Syntax
- File Upload Support
- CAPTCHA Integration
- Customizable Forms
- Akismet Anti-Spam
- Multiple Contact Forms
- Localized Translations
- Customizable Mail Template
- Ajax-Powered Submissions
WordPress Contact Form 7: Why Should You Use It?
A contact form offers a simple, convenient, and organized way for your visitors to reach out to you. It guarantees that your communication remains secure and professional.
As WordPress site owners, Contact Form 7 allows you to create the contact form without any expertise in coding.
That’s the number one reason to use Contact Form 7 for creating forms.
But there are a couple of more reasons why you should choose contact form 7:
- Cost-Free: It’s completely free, with no premium version or upsells cluttering your dashboard.
- Customizable: You can easily customize your forms using various parameters or by applying CSS for a personalized touch.
- Ease of Use: Creating and managing forms is straightforward, even for beginners.
- Theme Compatibility: It works seamlessly with both free and premium themes, ensuring your contact forms function properly even if you switch themes.
- Feature-Rich: It includes useful features like Ajax-powered submissions, CAPTCHA integration, and Akismet anti-spam, enhancing form functionality and security.
Step-by-Step Guide to Set Up Contact Form 7
First, Install the Contact Form 7 Plugin
To get started, you need to install the Contact Form 7 plugin. You can either download it from the official WordPress.org repository or find it directly from your WordPress dashboard.
Here’s how to do it:
- Go to your WordPress dashboard.
- Select Plugins from the menu, then click on Add New Plugin.

- In the search bar, type Contact Form 7.
- Once the plugin appears, click Install.
- After the installation is complete, click Activate.
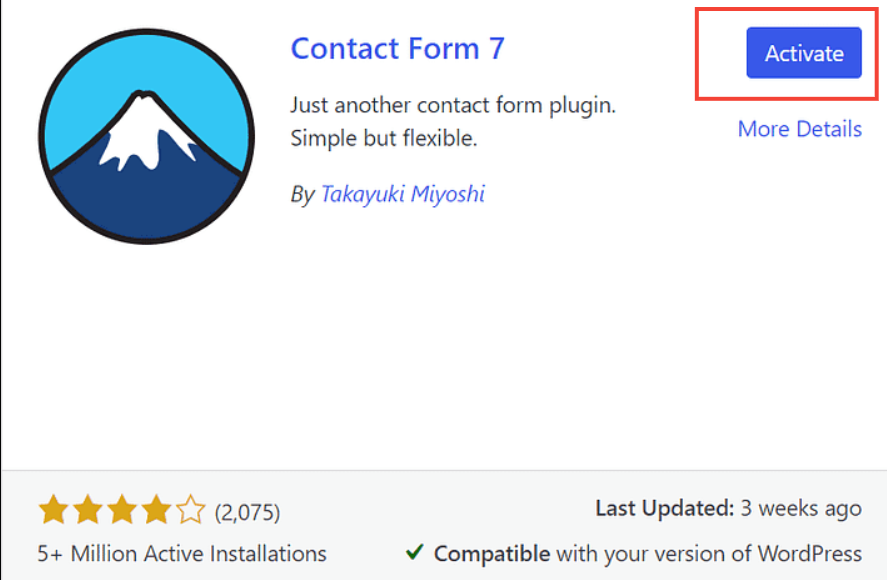
You will now see a new Contact section in your WordPress dashboard, where you can start using the plugin.

After successfully activating the plugin, you have now two options:
- You can use the default contact form
- Create your own custom contact form
Let’s check out each option in detail to set up Contact Form 7.
Option #1: Use the Default Contact Form 7 Form
When you install Contact Form 7, the plugin automatically creates a basic contact form for you. Follow the steps below to use the default contact Form 7 form.
Step #1: Locate the Default Form
- After installing the Contact Form 7 plugin, navigate to your WordPress dashboard.
- Go to Contact → Contact Forms.
- Find Contact Form 1, which the plugin creates automatically.

Step #2: Add the Form to a Post or Page
- Open the post or page where you want to add the contact form.
- Insert the Contact Form 7 block by selecting it from the block options.
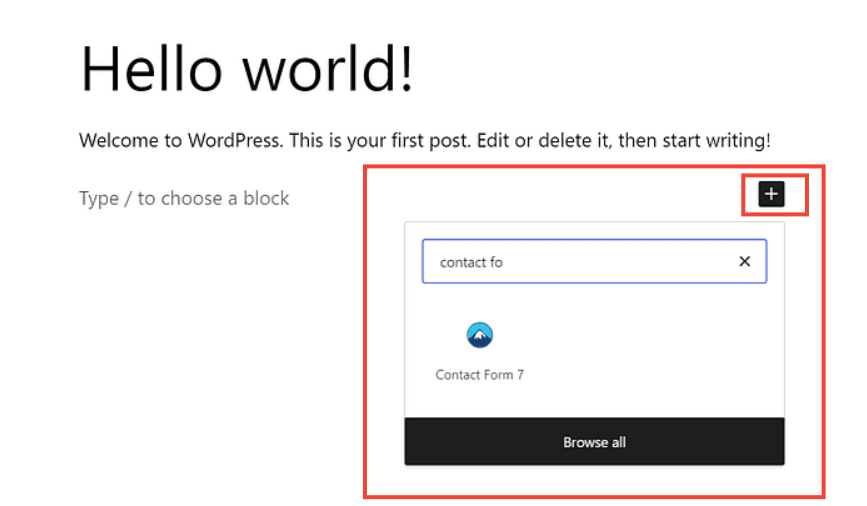
- Choose Contact Form 1 from the dropdown list.
NOTE: If you are using an old version of WordPress, then you might have Classic Editor, so check out our detailed guide on how to get Gutenberg Editor in WordPress.
Step #3: Preview the Form
- Click Preview to see how the form looks on your site.
- Ensure that the form appears correctly and functions as expected.
Use the Shortcode Method (Alternative)
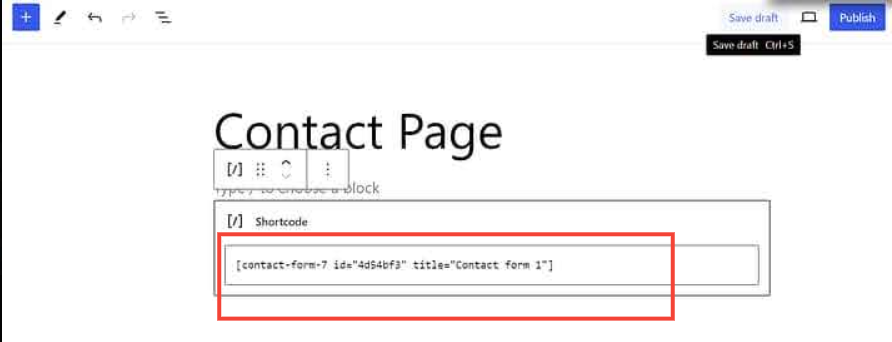
- In the Contact Forms section, locate the shortcode next to Contact Form 1.
- Copy the shortcode.
- Paste it into the desired post or page using the Shortcode block.
Step #4: Publish the Form
- Publish the post or page with the embedded form.
- Visitors will now be able to use the form to contact you.
- Messages sent through the form will be delivered to the email address of your site’s primary administrator account.
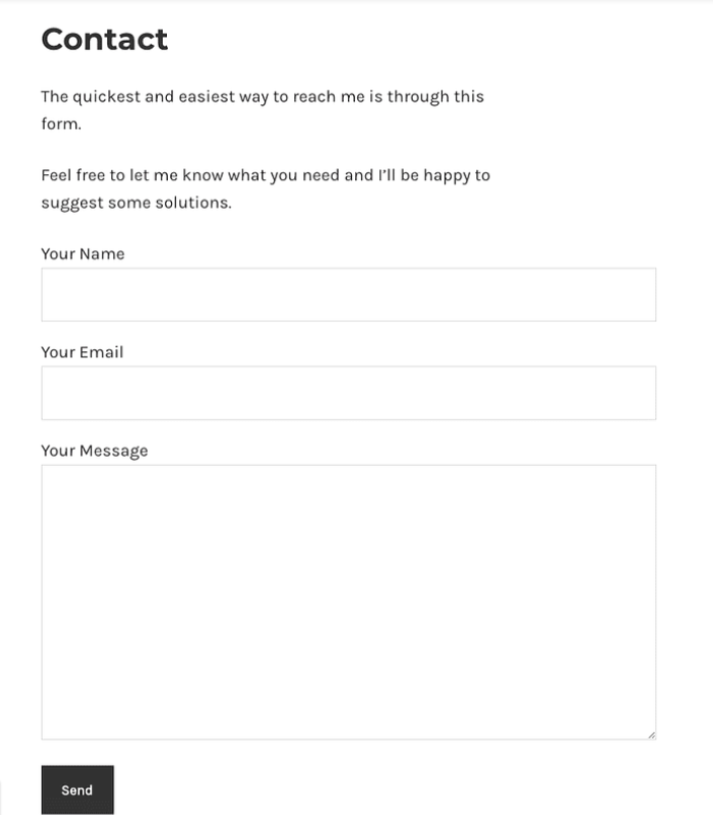
That’s how you can easily utilize the default contact form provided by Contact Form 7.
Option #2: Create Your Custom Form using Contact Form 7
If you want to create a custom form, follow the steps below to do so using the Contact Form 7.
Step #1: Start a New Form
- Go to your WordPress dashboard.
- Navigate to Contact → Add New.
- Enter a name for your new form.
Step #2: Customize Basic Form Fields
- The plugin automatically includes fields like name, email, subject, and message.
- Review these fields and decide if you want to keep them or add more.
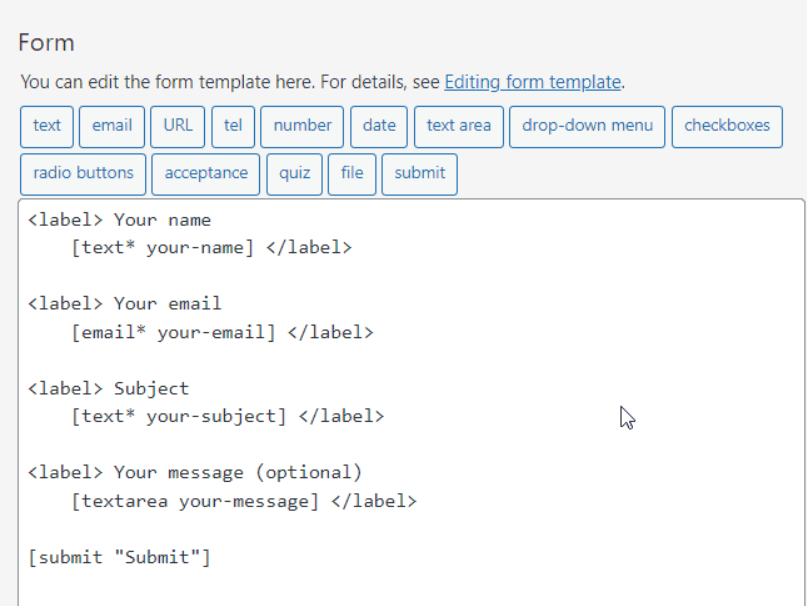
Step #3: Add a New Field
- Choose a new field from the tags available at the top of the form editor panel.

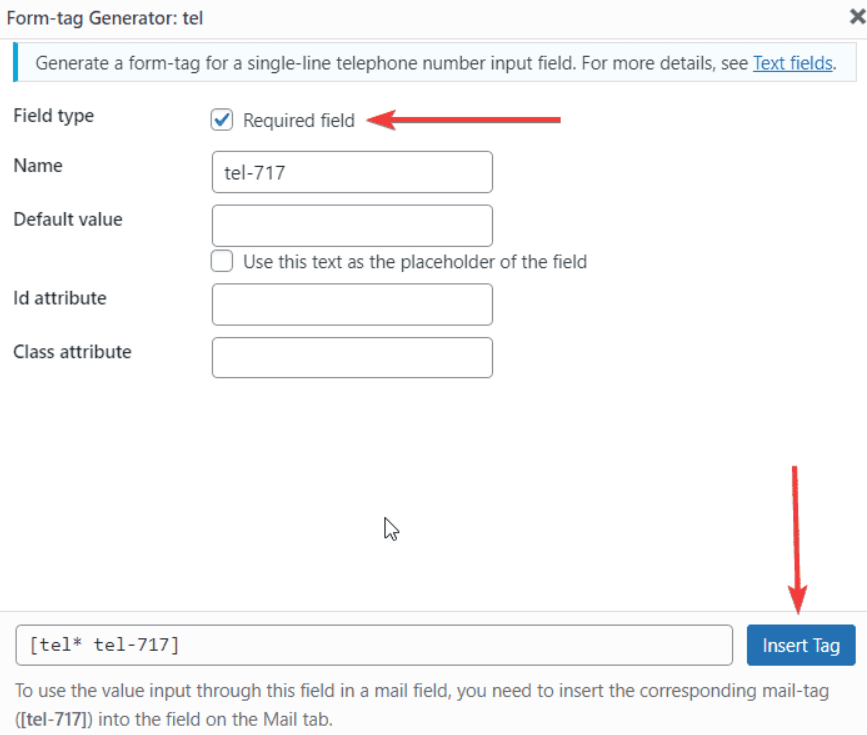
- For example, to add a telephone number field, click on the tel tag.
- A popup will appear with various options.
Step #4: Configure the New Field
- In the popup, you can configure options such as Name, Default value, ID attribute, and Class attribute.
- Select the Required field option if needed.
- Click on Insert Tag.
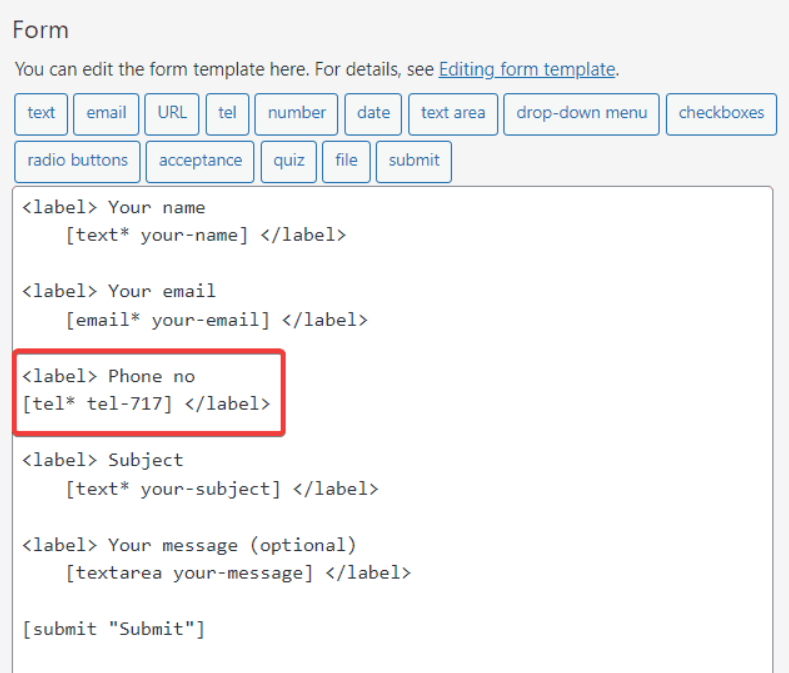
Step #5: Add a Label to Your New Field
- Add a label to your new field using <label> and </label> tags.
- Include the tag for the field (e.g., tel* for a required telephone number).
- Use a unique ID for the field (e.g., tel-717, but it will be different for each form).
- Add the text you want to display next to the field (e.g., “Phone no.”).
Step #6: Save Your Custom Form
- Save your new form by clicking on the Save button.
Step #7: Use the Form on Your Site
- Copy the shortcode for your new form.
- Paste it into any post or page using the Shortcode block, or insert the contact form block.
- Preview the post or page to ensure the form appears correctly.
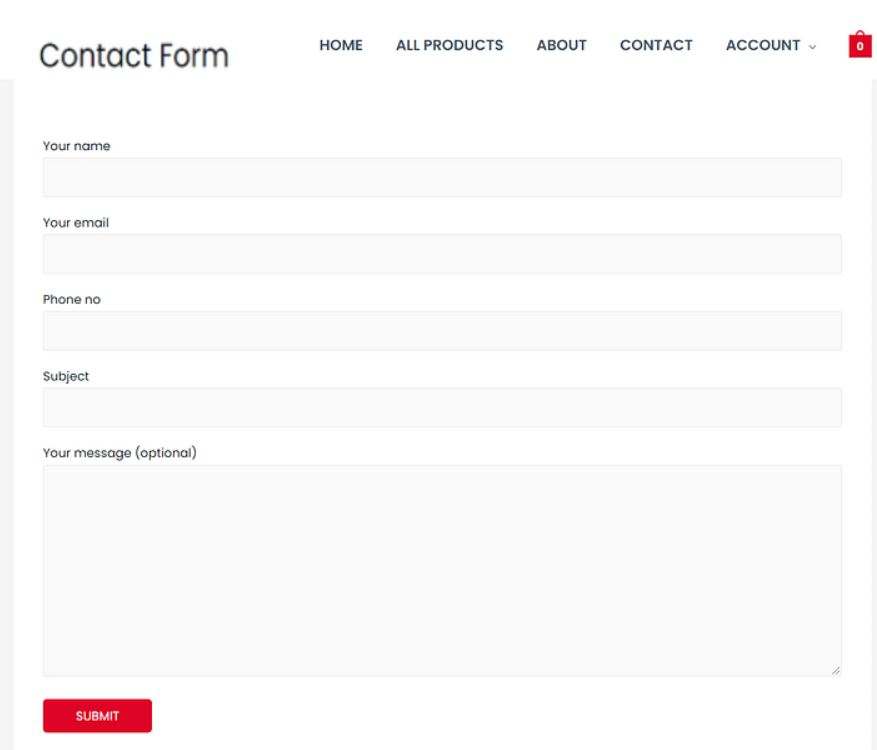
Congratulations you have now created the custom contact form tailored to your specific needs using Contact Form 7.
How to Set Up Contact Form 7 Email Delivery Settings
Now that your form is ready, it’s essential to configure the email settings. This ensures you receive notifications when someone fills out the form. You can find the email settings under the Mail tab next to the form editor.
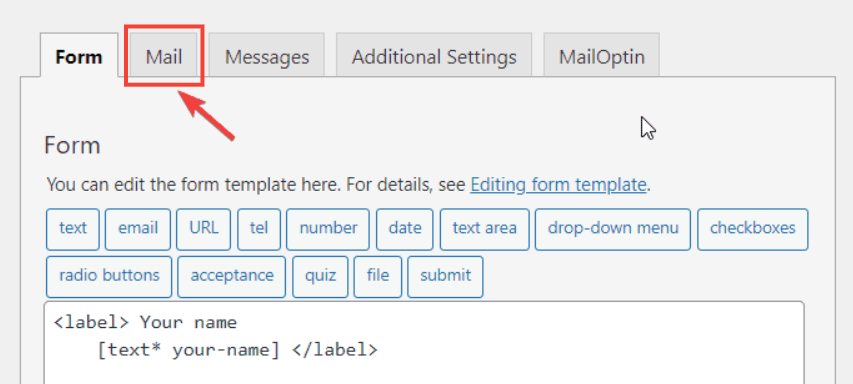
Here’s a step-by-step process to set up Contact Form 7 email delivery settings.
Step #1: Set the Recipient Email Address
- In the To field, enter the email address where you want to receive notifications.
- By default, Contact Form 7 uses the site admin’s email, but you can change it to any email address you prefer.
Step #2: Customize the Sender Information
- In the From field, you can customize the sender’s details.
- It’s a good practice to use your site’s name here, along with the sender’s email address.
Step #3: Set the Email Subject
- Customize the subject line of the email in the Subject field.
- If you’re unsure, you can leave it at its default value.
Step #4: Add Additional Headers
- Use the Additional headers field to include Cc or Bcc recipients.
- This can be useful if you want to send the email to multiple addresses.
Step #5: Customize the Message Body
- The Message body section allows you to modify the content of the email.
- Typically, you won’t need to change this unless you need to add specific information for your CRM or other systems.
Step #6: Include File Attachments
- If your form includes a file upload field, ensure you add the corresponding file tag in the File attachments field.
By configuring these settings, you make sure that all form submissions are properly delivered to your chosen email address, keeping your email communication seamless and efficient.
Final Thoughts on How to Set Up Contact Form 7
By now, you should have Contact Form 7 set up and functional. This plugin provides all the essential features to ensure your visitors can send messages that arrive directly in your inbox.
However, Contact Form 7 offers even more possibilities. For instance, you can integrate Contact Form 7 with popular email marketing services like Brevo and Mailchimp. This integration allows you to collect email addresses through your forms and export them to your chosen email marketing tool.
Additionally, many third-party plugins can enhance Contact Form 7’s capabilities, offering even more customization and functionality.
If you have any questions or thoughts about Contact Form 7, feel free to share them in the comments below.

![How to Set Up Contact Form 7 [Ultimate Guide 2025] How to Set Up Contact Form 7](https://www.wpdisc.com/wp-content/uploads/2024/07/how-to-set-up-contact-form-7-1024x520.png)

![How to Have 2 Lines of Text in WordPress Header [5 Easy Ways] How to Have 2 Lines of Text in WordPress Header [5 Easy Ways]](https://www.wpdisc.com/wp-content/uploads/2025/02/how-to-have-2-lines-of-text-in-wordpress-header-1024x520.png)

![How to Clone My Website to a Second URL [9 Easy Steps] How to Clone My Website to a Second URL [9 Easy Steps]](https://www.wpdisc.com/wp-content/uploads/2025/01/how-to-clone-my-website-to-a-second-url-1024x520.png)
Leave a Reply