If you’re using MailChimp to manage subscribers for your WordPress site, you can easily integrate all the contact forms you created using Contact Form 7 with MailChimp.
The best thing about this integration is that it automatically adds new subscribers to your Mailchimp mailing lists whenever they submit a form.
Mailchimp helps you manage your subscribers and automate your email campaigns, making it easy to communicate with your audience. However, manually adding new subscribers to your mailing lists can be tedious, especially if you have a large number of them. Integrating Mailchimp with Contact Form 7 streamlines this process.
In this guide, we will show you how to integrate Contact Form 7 with Mailchimp in five easy steps.
Ready? Let’s begin.
What is MailChimp? –Brief Introduction
Mailchimp is a popular email marketing service that helps you manage your subscriber lists and send automated emails. It offers a free plan for up to 500 subscribers, making it an excellent choice for beginners.
With Mailchimp, you can create and maintain subscriber lists, design email campaigns, and track their performance. It integrates seamlessly with WordPress, allowing you to streamline your email marketing efforts and effectively communicate with your audience.

The Benefits of Using Contact Form 7 with MailChimp
As you know, MailChimp lets you easily add subscribers through Contact Form 7. By doing so, you can have the following benefits:
- Automated Subscriber Addition: Mailchimp adds new subscribers automatically, saving you time and effort.
- Efficient Tagging: Automatically tagging new contacts ensures better organization and targeted marketing.
- Seamless Campaign Integration: Empower your marketing strategy by adding users directly to automated email campaigns.
- Customizable Forms: You can design subscription forms to match your website’s theme, providing a cohesive user experience.
- Flexible Form Fields: You have complete control over form fields, allowing you to send any field data to Mailchimp.
- Easy Form Placement: Using the CF7/Mailchimp shortcode, you can display sign-up forms anywhere on your website.
- Improved User Engagement: By automating the subscription process, you can focus on creating engaging content and growing your audience.
5 Easy Steps to Integrate Contact Form 7 with Mailchimp
Step #1: Get The API key From Your MailChimp Account
To get your MailChimp API key, follow these steps:
- First, log into your Mailchimp account.
- Once logged in, navigate to your profile.
- Then, find and select the “API keys” under the “Extras” menu.
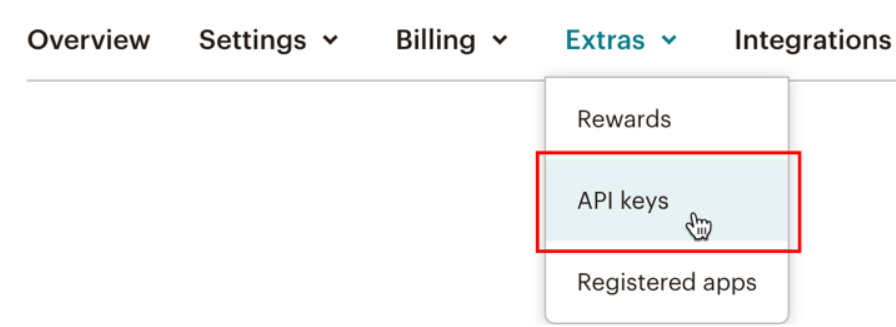
- Locate the desired API key and copy it.

- Make sure to save this API key in a secure place where you can easily access it later because you will need it to connect your WordPress site with MailChimp.
NOTE: If you don’t already have an API key, simply click “Create A Key” to generate a new one.
Step #2: Install MailChimp for WordPress Plugin
The Mailchimp for WordPress plugin allows you to manage your Mailchimp lists directly from your WordPress site. One of its main benefits is the seamless integration of Contact Form 7 with your Mailchimp account.
To install the Mailchimp for WordPress plugin, follow the steps below.
- Go to your WordPress dashboard.
- Navigate to Plugins → Add New Plugin.
- Search for “Mailchimp for WordPress.”

- Click “Install Now.”
- Then, Activate the plugin.
NOTE: You can also download the plugin from the WordPress Plugin Directory and upload the zip file via the Plugins section.
Step #3: Connect Your MailChimp Account with WordPress
To connect your WordPress site with your Mailchimp account, follow these steps:
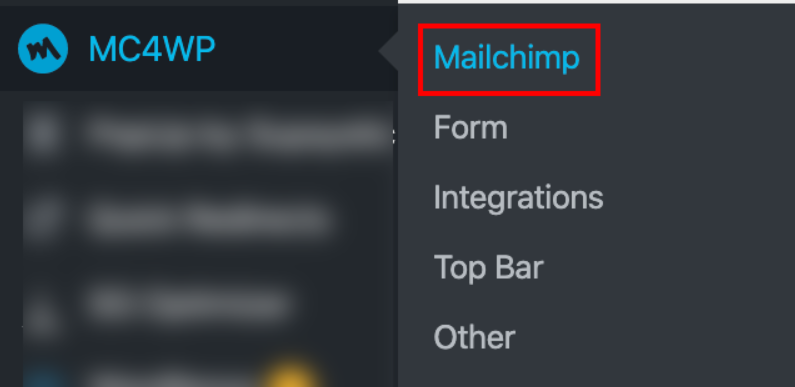
- On your WordPress dashboard, go to MC4WP → Mailchimp.
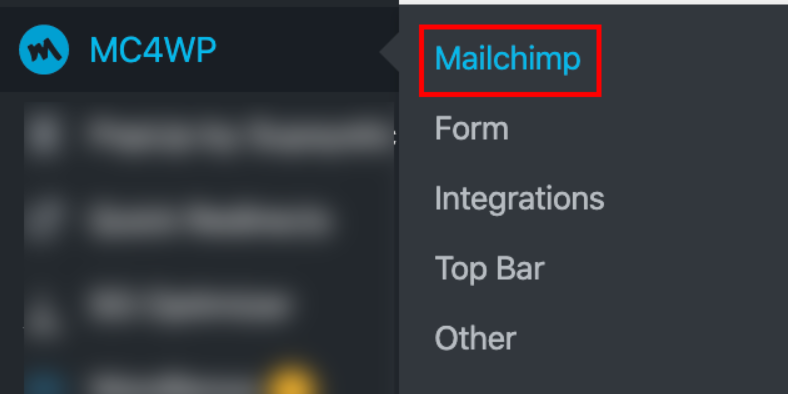
- Paste the API Key you copied in Step #1 into the provided textbox.

- Click “Save Changes.”
If the connection is successful, you should see a “Connected” status.

On the same page, you can also view your audience lists and their respective fields.
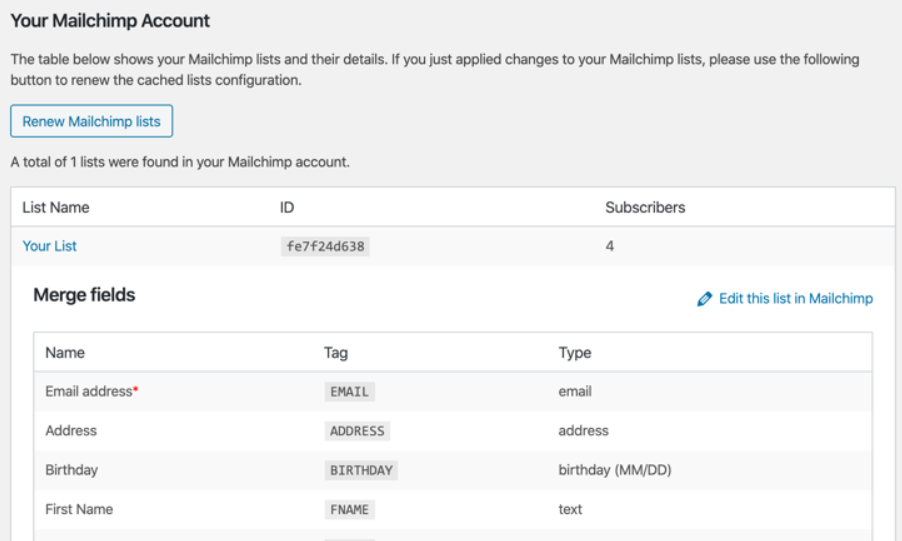
Pro Tip: If you update existing audience lists or create new ones in your Mailchimp account, click “Renew Mailchimp lists” in WordPress to see the changes.
Step #4: Configure Contact Form 7 with MailChimp
Follow the steps below to integrate Contact Form 7 with MailChimp:
- Go to your WordPress dashboard and navigate to MC4WP → Integrations.
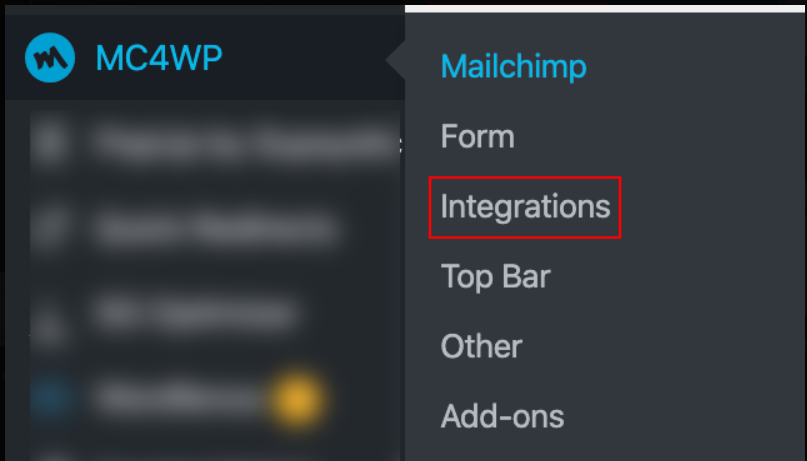
- Click on “Contact Form 7.”

- Under the “Mailchimp Lists” section, select the lists where you want to add subscribers from CF7.
- Choose your desired configurations.
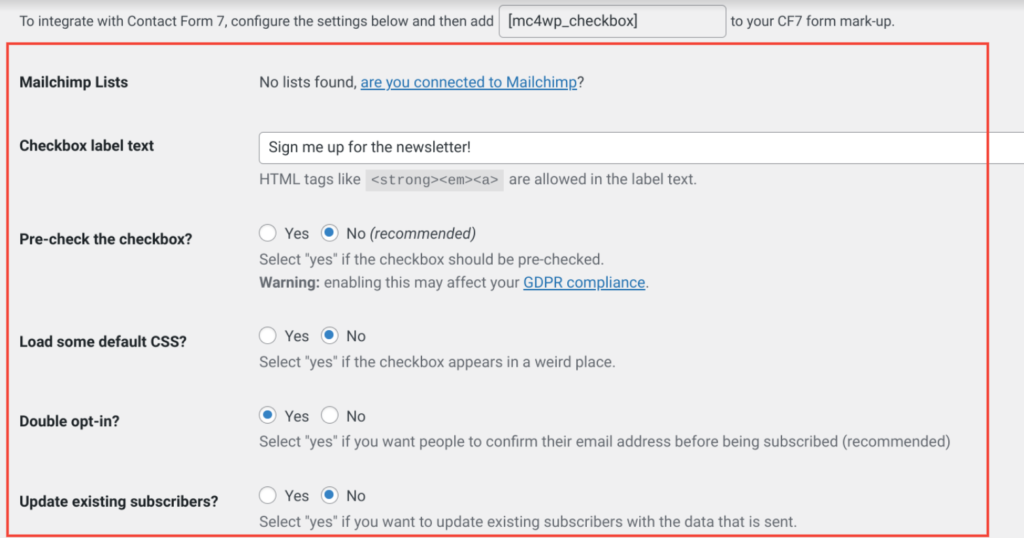
- Click “Save Changes.”
NOTE: Only the lists selected on this page will be integrated with the CF7 forms on your website.
Step #5: Create a Contact Form with Contact Form 7
To create a contact form for Mailchimp using Contact Form 7, follow these steps:
- Go to your WordPress dashboard and navigate to Contact → Add New.
- Add the necessary fields for subscribers to enter their information.
NOTE: Prefix each field name with mc4wp- and use uppercase letters for the field names.
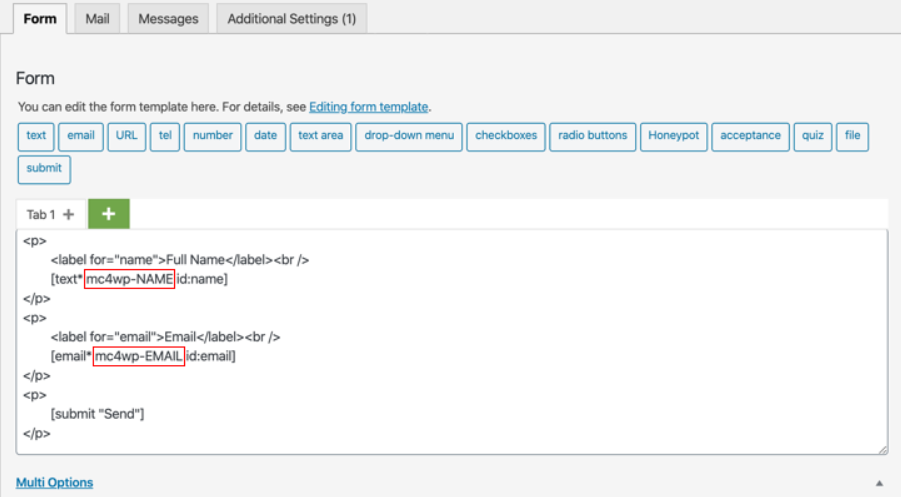
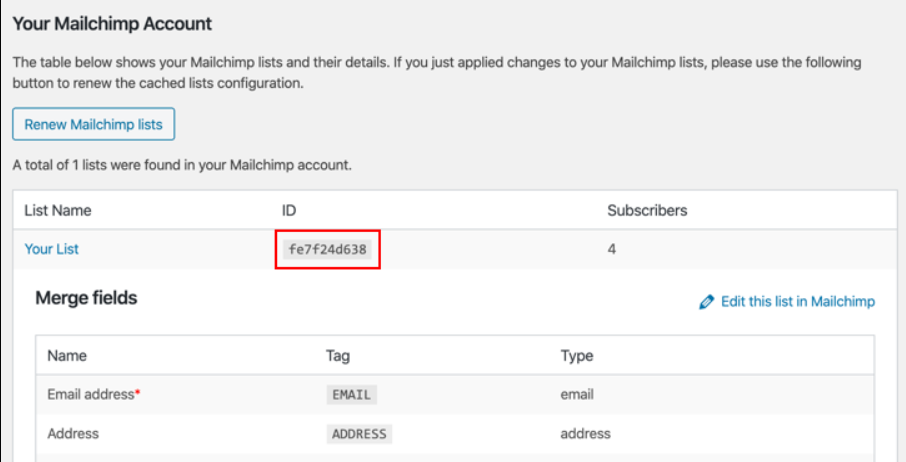
- To ensure the form field names match Mailchimp’s field names, go to MC4WP → Mailchimp. Click on your list’s name and check the tags for each field.
- Include the [mc4wp_checkbox] tag in the form. The data will be sent to Mailchimp if this checkbox is selected.
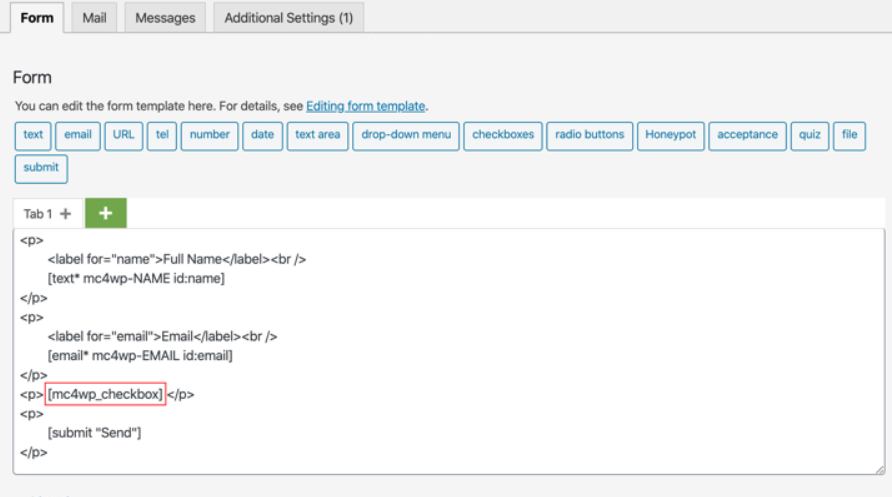
Pro Tip: If you prefer to add all form submissions as subscribers without using the checkbox, add <input type=”hidden” name=”mc4wp-subscribe” value=”1″ /> to your form.
- Click “Save” to apply your changes.
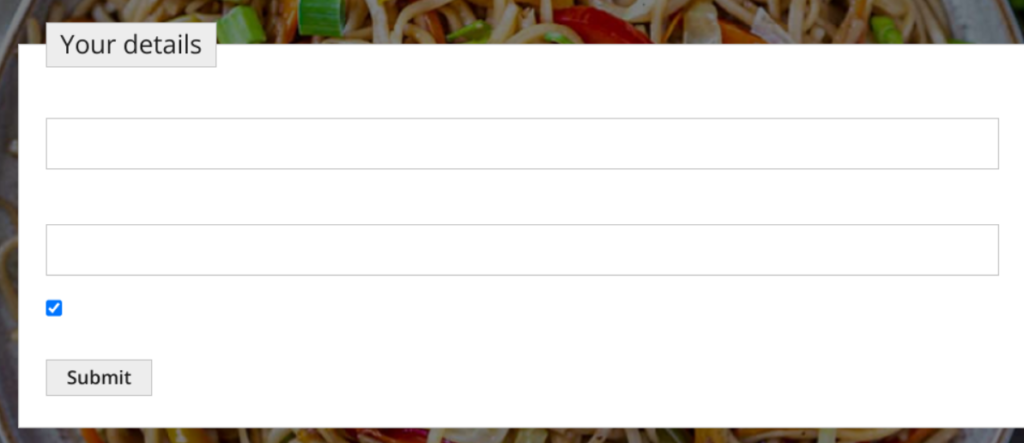
That’s it. From now on, whenever a user submits the form and selects the checkbox, their name and email will be added to the configured Mailchimp list.
NOTE: If you need further details about the form creation using Contact Form 7, then check out our detailed guide on how to set up Contact Form 7 in WordPress.
How to Assign any Specific MailChimp List to Contact Form 7
If you manage multiple subscriber lists in Mailchimp, you might want to direct submissions from different Contact Form 7 forms to specific lists.
Here’s how to assign a particular Mailchimp list to a Contact Form 7 form:
- Go to MC4WP → Mailchimp in your WordPress dashboard.
- Scroll down to find the list you want to use and copy its ID.
- In your Contact Form 7 form, add the following HTML code:
<input name="_mc4wp_lists[]" type="hidden" value="<list id>" />- Replace <list id> with the ID you copied in the previous step.
- Click “Save” to apply the changes.
By following these steps, submissions from this form will be added to the specified Mailchimp list.
Final Remarks on Integrating Contact Form 7 with MailChimp
Integrating Contact Form 7 with MailChimp simplifies managing your WordPress website subscribers and email campaigns. By following these five easy steps, you can automate the process of adding new contacts from your website forms to your MailChimp lists.
With seamless integration, you have full control over your form fields and can ensure your forms match your website’s design. Start integrating Contact Form 7 with MailChimp today and effortlessly boost your email marketing efficiency.
If you have any questions about integrating Contact Form 7 with MailChimp, feel free to ask in the comments below. We would love to answer!

![How to Have 2 Lines of Text in WordPress Header [5 Easy Ways] How to Have 2 Lines of Text in WordPress Header [5 Easy Ways]](https://www.wpdisc.com/wp-content/uploads/2025/02/how-to-have-2-lines-of-text-in-wordpress-header-1024x520.png)

![How to Clone My Website to a Second URL [9 Easy Steps] How to Clone My Website to a Second URL [9 Easy Steps]](https://www.wpdisc.com/wp-content/uploads/2025/01/how-to-clone-my-website-to-a-second-url-1024x520.png)
Leave a Reply