Do you want to create a contact form in WordPress? If so, then you’ve landed on the right page.
A contact form is essential for every website, as it allows your website visitors to reach out to you about your products and services easily.
Unfortunately, WordPress doesn’t include a built-in contact form by default, but there’s an easy solution.
In this article, we’ll guide you through the simple steps to create a contact form in WordPress without writing any code.
Excited? Let’s get started.
Why Should You Create a Contact Form in WordPress?
You might wonder why I need a contact form. Can’t I just put my email address on my website so people can email me?
Many beginners have this question because they fear adding a contact form requires coding knowledge. Fortunately, with a WordPress contact form plugin, you can easily add a contact form to your site without any coding.
Here are some of the reasons why a contact form is better than displaying your email address.
- Protection Against Spam: Spam bots scour websites for email addresses. If you display your email address, you’ll likely receive many spam emails. A contact form can prevent spam by blocking these unwanted messages.
- Better User Experience: Asking users to copy your email address and then compose an email involves several steps. A contact form simplifies this process. Users can quickly fill out the form and send their message directly from your website, keeping them engaged and on your site.
- Time Savings: Contact forms save time by ensuring you receive consistent information. They can also provide automatic responses, guiding users on the next steps, like waiting for a response or watching a video, which helps manage their expectations and reduces repeated inquiries.
- Well-organized Information: Emails can vary widely in style and format, making them difficult to interpret. A contact form standardizes the information you receive, as you control the form fields and structure, ensuring you get the details you need.
Now, let’s go through the steps to create a contact form in WordPress and add it to your website.
5 Easy Steps to Create a Contact Form in WordPress
You can easily add a contact form to WordPress without writing any code! Simply follow these steps, and you will have a working contact form in no time at all.
Step #1: Select a Contact Form Plugin for Your Website
First, you need to choose the best contact form plugin for your site. With so many options available, finding the right one can be overwhelming. Here are some top WordPress contact form plugins to consider:
- Gravity Forms: Offers over 30 form field types, integrations with payment processors, and templates for complex forms like quizzes and surveys.
- Ninja Forms: Integrated with platforms like AWeber and CampaignMonitor, this plugin has over 40 premium add-ons, which is ideal for those who need extensive integrations.
- WPForms: An easy-to-use drag-and-drop form builder. It lets you create beautiful contact forms, subscription forms, payment forms, and more in minutes without needing a developer.
- Formidable Forms: Known for its clean drag-and-drop interface, this builder includes over 15 premium add-ons and can create advanced calculators.
- Contact Form 7: A free and powerful form plugin with numerous integrations, including Mailchimp and Stripe.
For this tutorial, we’ll use WPForms, which is one of the best contact form plugins for WordPress.
If you want to use Contact Form 7 then check our detailed article to learn how to set up Contact Form 7.
Now, let’s install WPForms on your site.
Step #2: Install the Contact Form Plugin on Your Site
- Open WordPress Dashboard: Start by logging into your WordPress dashboard.
- Navigate to Plugins: Go to the left-hand menu and click on “Plugins.” Then, select “Add New Plugin.”
- Search for WPForms: In the search bar, type “WPForms” to locate the plugin.
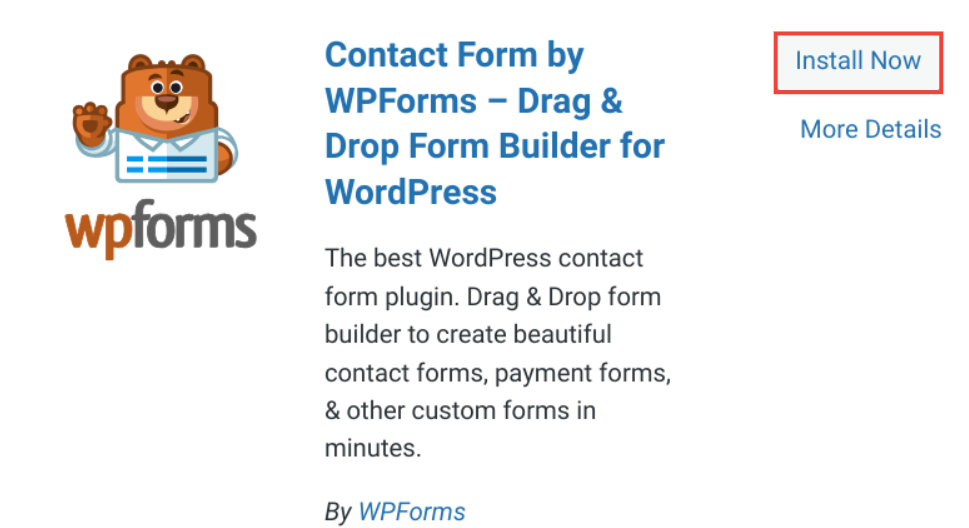
- Install the Plugin: Once you find WPForms Lite, click the “Install Now” button.
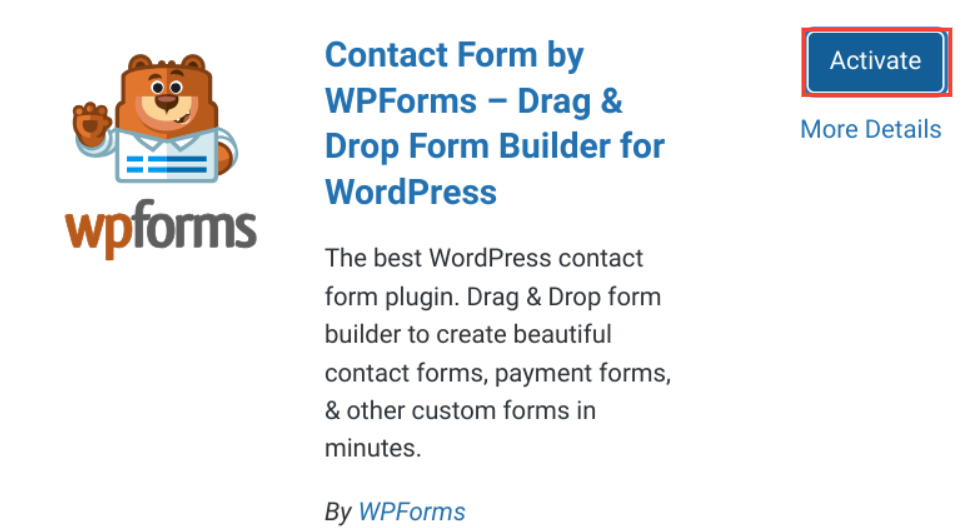
- Activate the Plugin: After the installation is complete, click “Activate” to enable the plugin.
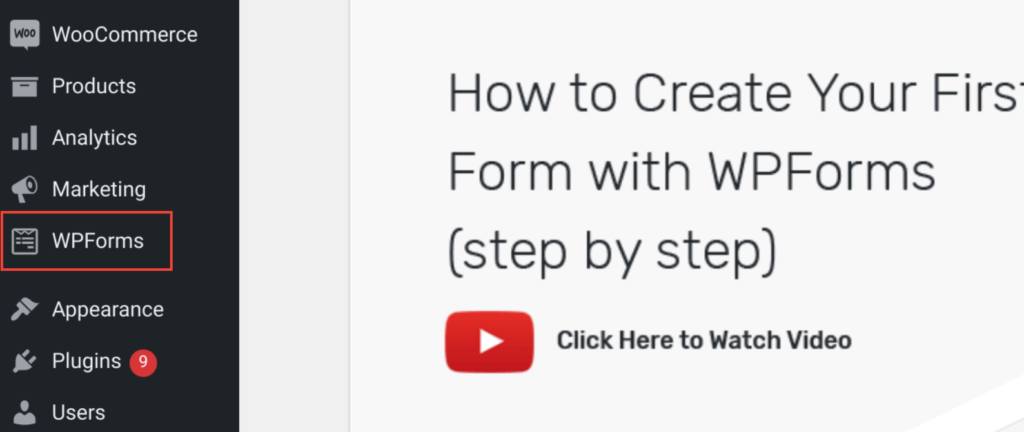
- Access WPForms: You’ll see a welcome page on your screen and a new WPForms menu in your WordPress admin area.
Step 3: Create Your First WordPress Contact Form
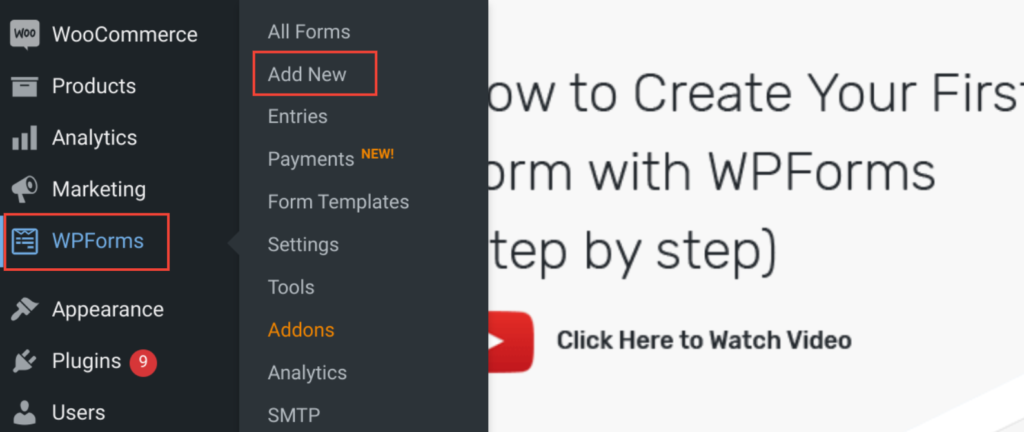
- Open WPForms: In your WordPress admin area, navigate to WPForms and click on “Add New.”
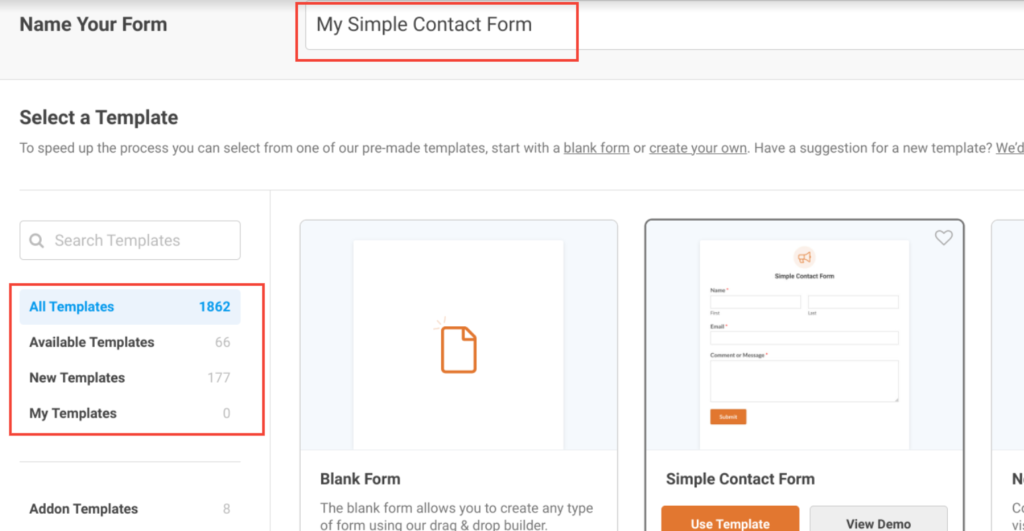
- Set Up the Form: On the form setup page, enter a name for your form and select the “Simple Contact Form” template.
- Use the Drag-and-Drop Builder: The WPForms drag-and-drop builder will open with a ready-to-use simple contact form. This pre-made form includes basic fields like Name, Email, and Message box.
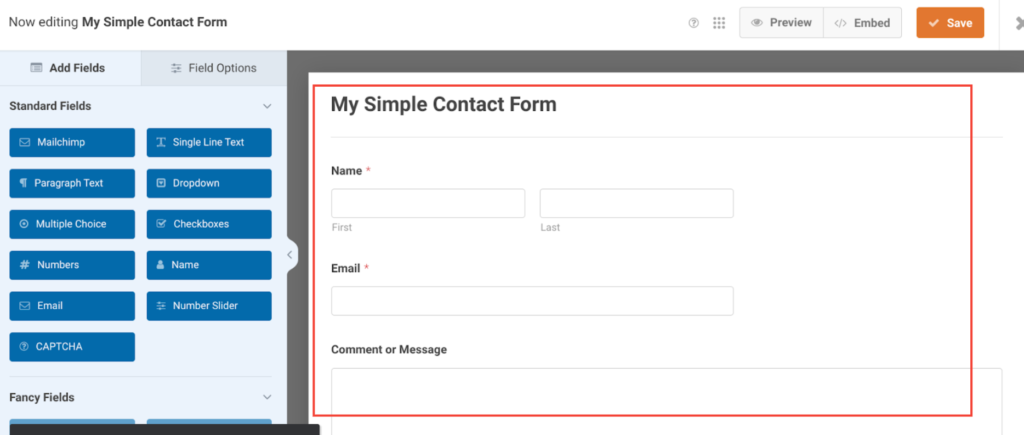
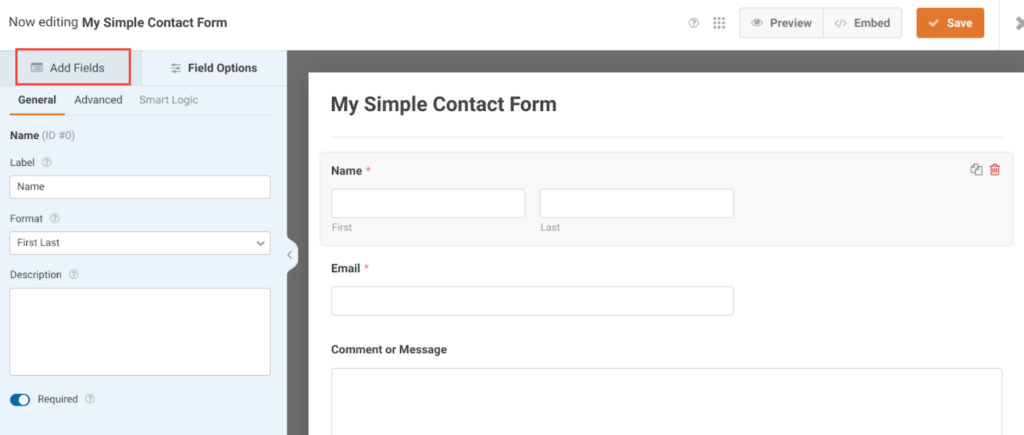
- Customize the Form: If the default fields meet your needs, click the “Save” button at the top. To add additional fields, drag them from the left side of the builder to the right.
- Access Advanced Features: With WPForms Lite, you can only use standard fields. To access Fancy Fields and Payment Fields, you’ll need to purchase WPForms Pro. This upgrade lets you create advanced forms like order forms, donation forms, and survey forms.
- Reorder and Edit Fields: Customize the form by dragging and reordering the fields. Click on the “Field Options” tab to customize each field further.
- Save Your Form: Once you’ve finished customizing, click “Save” to save your form.
Step #4: Configure Notifications and Confirmations
After creating your contact form, it’s important to correctly set up your form notifications and confirmations.
A contact form notification is an email you receive whenever a user sends a message through your contact form on the site.
- Access Form Settings: After creating your contact form, go to the form creation area. Navigate to Settings → Notifications.
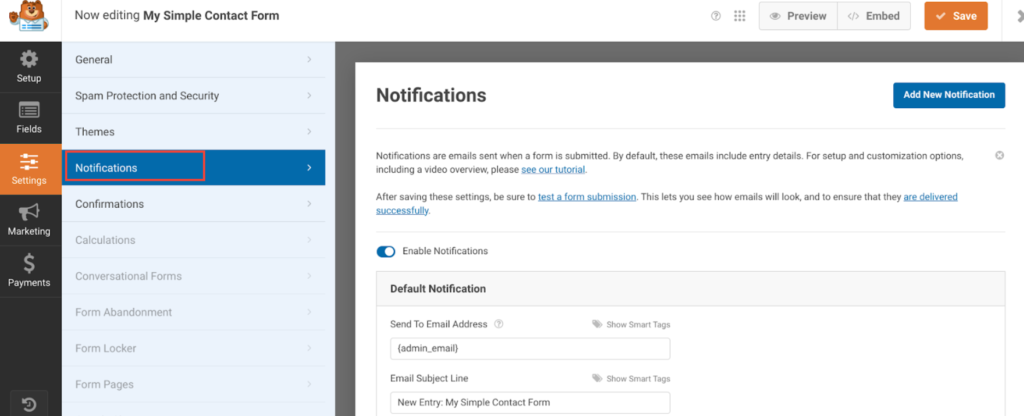
- Set Up Notifications: Here, you’ll find default settings that send email notifications to the administrator’s email. You can leave these settings as they are for simplicity.
- Configure Confirmations: To set up form confirmations, go to Settings → Confirmation in the form creation area.
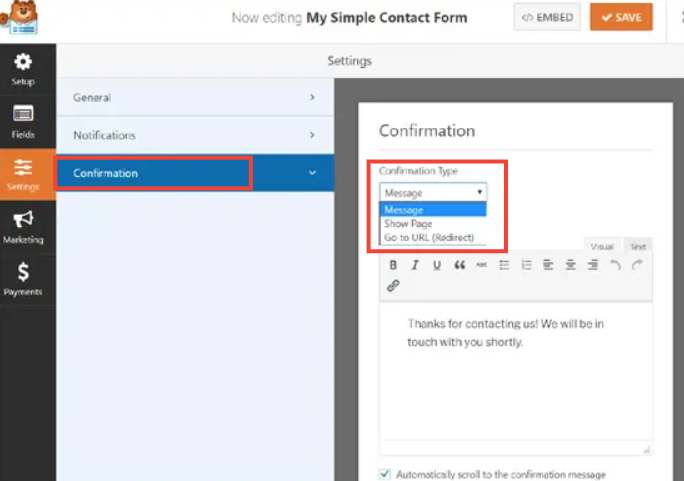
- Choose Confirmation Type: By default, the confirmation type is set to “Message.” You can leave it as is or change it to “Show Page” or “Go to URL” based on your preference.

- Save Changes: If you made any changes, ensure you click the “Save” button to apply them.
Form confirmations let visitors know their message has been successfully submitted. You can thank them, display a page, or redirect them to a specific URL.
Step #5: Publish Your Contact Form on WordPress Page
Now that you’ve created your contact form settings in WordPress let’s see how to add it to a page or post.
- Open or Create a Page: Start by creating a new page or editing an existing one where you want to add your contact form.
- Using Classic Editor: If you’re using the Classic editor, click the “Add Form” button in the page or post editor.
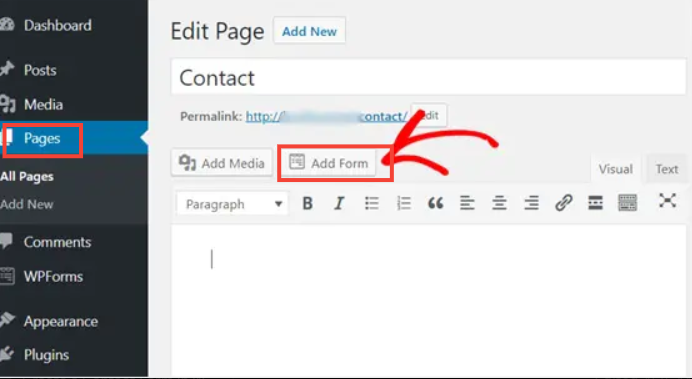
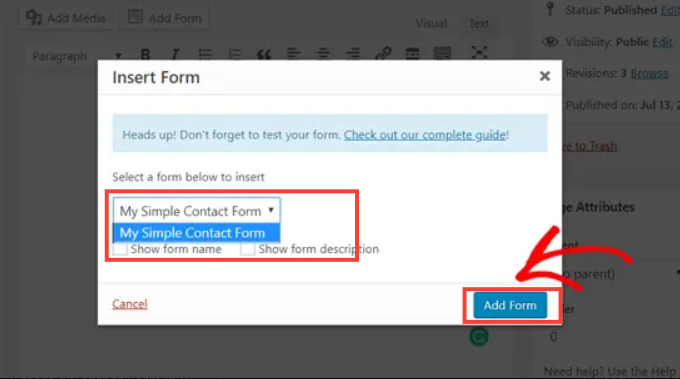
- Select Your Form: A popup box will appear. Choose the contact form you want to add and click “Add Form.”
- Insert Shortcode: The contact form shortcode will be inserted into your page content. Save your page to apply the changes.
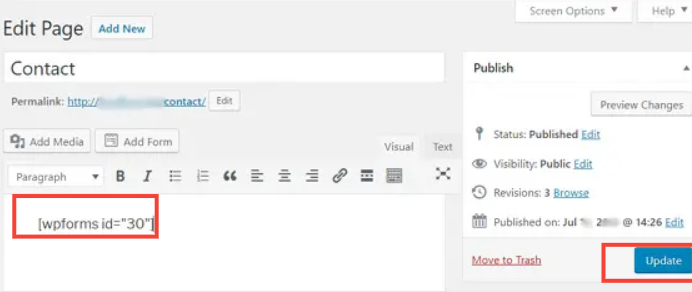
- Preview the Page: Open or preview the page to check how the contact form looks. This will give you a view of the form as it appears with your current WordPress theme.
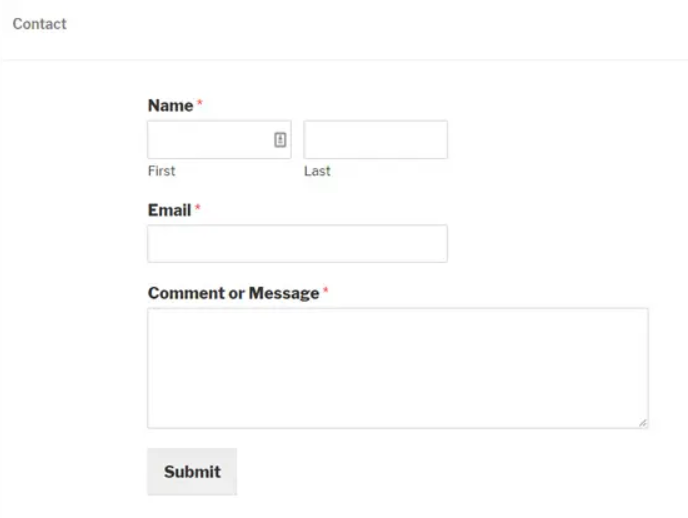
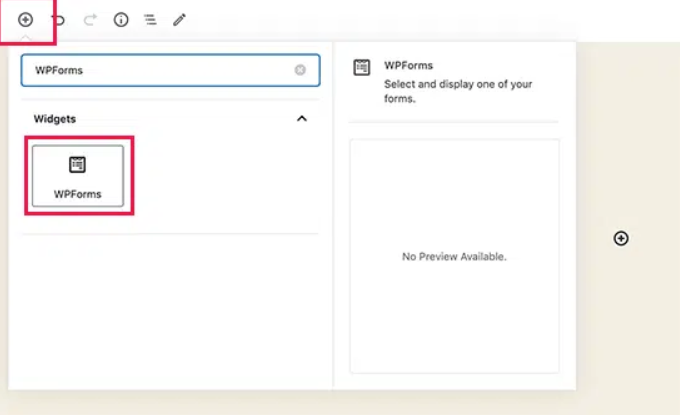
- Using Gutenberg Block Editor: If you’re using the Gutenberg block editor, add the WPForms block to your page.
- Select Your Form: Click on the dropdown menu within the WPForms block to select the form you want to display.
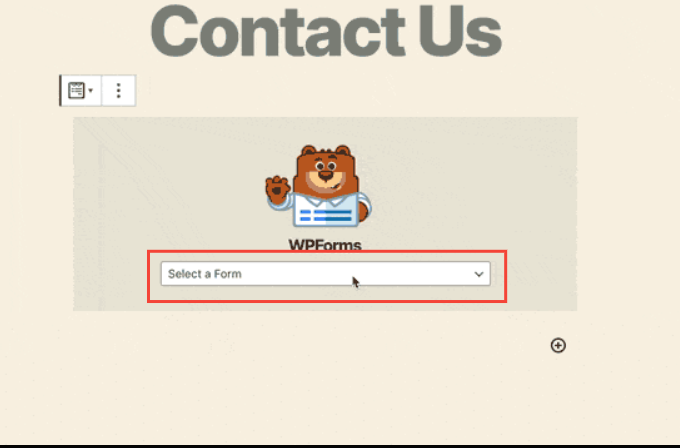
Congratulations! Your contact form has been successfully added to your WordPress page/post using WPForms.
Final Remarks
Congratulations on creating and publishing your contact form in WordPress! You now have a functional and easy-to-use contact form on your site. This form will help you manage visitor inquiries efficiently and provide a better user experience.
Remember to test the form to ensure it works as expected. Check notifications and confirmations to verify they are set up correctly. Regularly review and update your form as needed to keep it relevant and effective.
We hope this article helped you create a contact form in WordPress. If you have any questions about WordPress contact form creation, let us know in the comment section below.
Frequently Asked Questions
Does WordPress have a 100% free contact form plugin?
Yes, WordPress offers free contact form plugins such as Contact Form 7 and WPForms Lite, which provide basic functionality at no cost.
Is there a built-in contact form in WordPress?
No, WordPress does not include a built-in contact form feature. You need to install a plugin to add a contact form to your website.
How can I add a contact form to WordPress?
To add a contact form, first install a contact form plugin like WPForms. Create your form using the plugin’s interface, then add it to your page or post using the plugin’s shortcode or block.

![How to Create a Contact Form in WordPress [5 Easy Steps] How to Create a Contact Form in WordPress](https://www.wpdisc.com/wp-content/uploads/2024/08/how-to-create-a-contact-form-in-wordpress-1024x512.png)

![How to Have 2 Lines of Text in WordPress Header [5 Easy Ways] How to Have 2 Lines of Text in WordPress Header [5 Easy Ways]](https://www.wpdisc.com/wp-content/uploads/2025/02/how-to-have-2-lines-of-text-in-wordpress-header-1024x520.png)

![How to Clone My Website to a Second URL [9 Easy Steps] How to Clone My Website to a Second URL [9 Easy Steps]](https://www.wpdisc.com/wp-content/uploads/2025/01/how-to-clone-my-website-to-a-second-url-1024x520.png)
Leave a Reply