Are you looking for an easy way to add reCAPTCHA to Contact Form 7? If so, you’ve landed on the right page.
Adding reCAPTCHA is a great way to block spam submissions from bots. But, for it to be effective, you need to integrate it properly with Contact Form 7. Don’t worry, though. The process is quite simple.
In this article, we’ll show you how to add reCAPTCHA to Contact Form 7 in just two easy steps and explain why you should do so.
Ready? Let’s get started!
Why Should You Add reCAPTCHA to Contact Form 7?
By default, when you set up Contact Form 7, it doesn’t include spam protection. Adding reCAPTCHA to Contact Form 7 improves security and user experience. By adding reCAPTCHA, you can effectively reduce spam, prevent abuse, and ensure that your contact forms are used only by legitimate users.
Here are some of the key reasons why you should add reCAPTCHA to your Contact Form 7:
- Prevent Spam Submissions: reCAPTCHA blocks automated bots from submitting your forms, keeping your inbox free of spam.
- Enhance User Experience: A secure and spam-free form builds trust with your visitors, ensuring a smoother interaction with your site.
- Improve Security: reCAPTCHA helps protect your site from malicious attacks by verifying that a real person is submitting the form.
- Reduce Server Load: Filtering out bot traffic can lower the strain on your server, improving overall site performance.
- Easy Integration: reCAPTCHA is easy to set up and integrate with Contact Form 7, making it a convenient solution for website owners.
2 Simple Steps to Add reCAPTCHA to Contact Form 7
First, we will register the website on Google and create reCAPTCHA API keys. Then, set up reCAPTCHA on Contact Form 7.
Let’s walk through the process step by step.
Step #1: Create reCAPTCHA API Keys
To integrate reCAPTCHA with Contact Form 7, you need to get API keys from Google. To do so, visit the Google reCAPTCHA admin page and register your site.
Follow these steps to get your API keys:
- Visit the Google reCAPTCHA page.
- Sign in to your Google account.
- Click on the “v3 Admin Console” option.
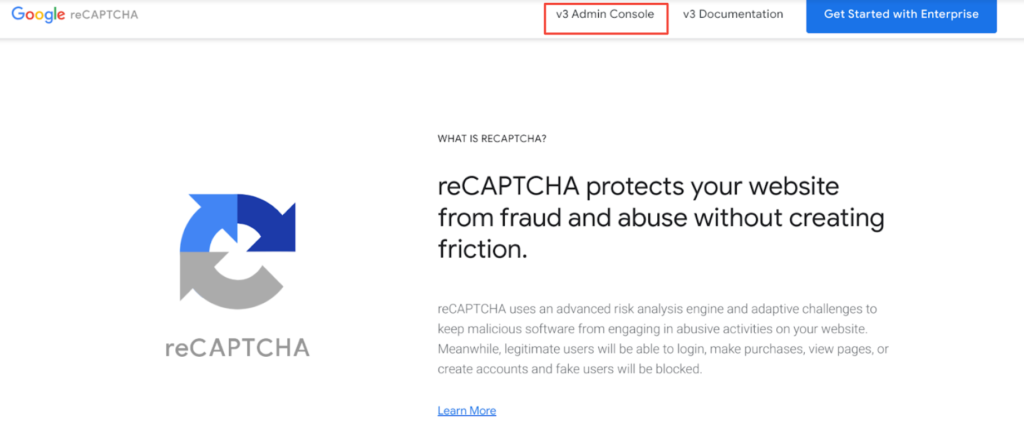
- On the subsequent page, you need to provide the details to generate the Site Key and Secret Key.
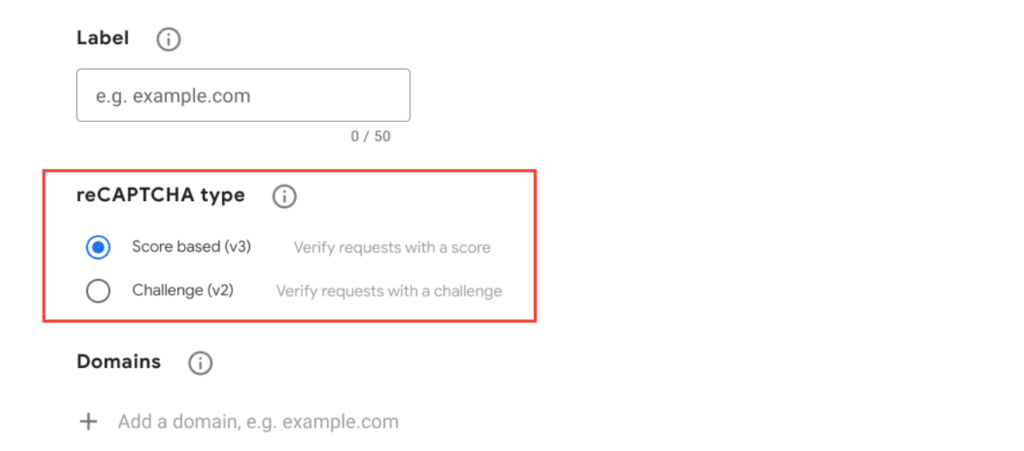
- Enter the label for your domain.
- Choose the “reCAPTCHA type (v3 or v2).
- Type in your domain next to the “+” icon under the Domains section.

- Scroll down and click on “Submit”.
- Once you click on “Submit”, the page will generate your site key and secret key.
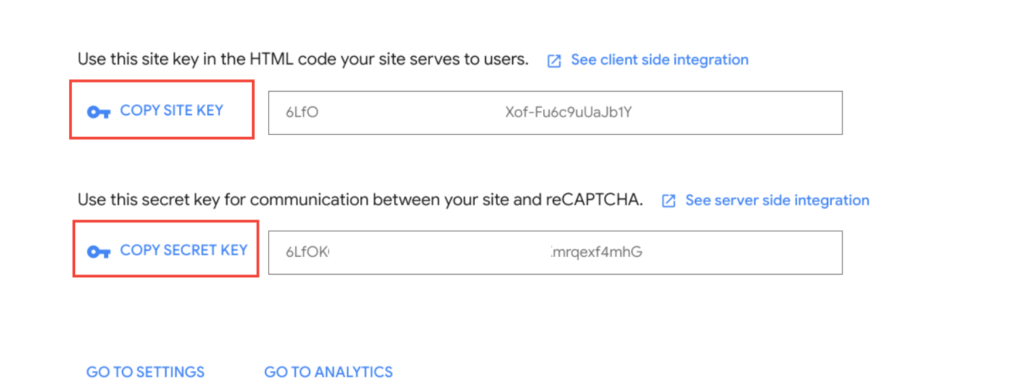
Save these API keys, as you’ll need them in the next steps.
Step #2: Set Up reCAPTCHA for Contact Form 7
Once you have your API keys, the next step is to set up reCAPTCHA for Contact Form 7 on your WordPress dashboard.
To configure the reCaptcha in Contact Form 7, follow these steps:
- Login to your WordPress admin dashboard
- Navigate to Contact → Integration.
- On the integration page, scroll down and look for reCAPTCHA.
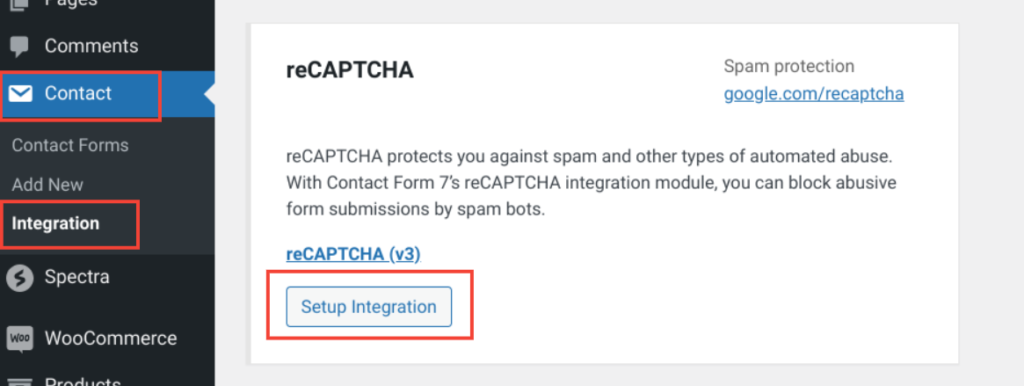
- Next, click on “Setup Integration,” and you’ll see fields for API keys.
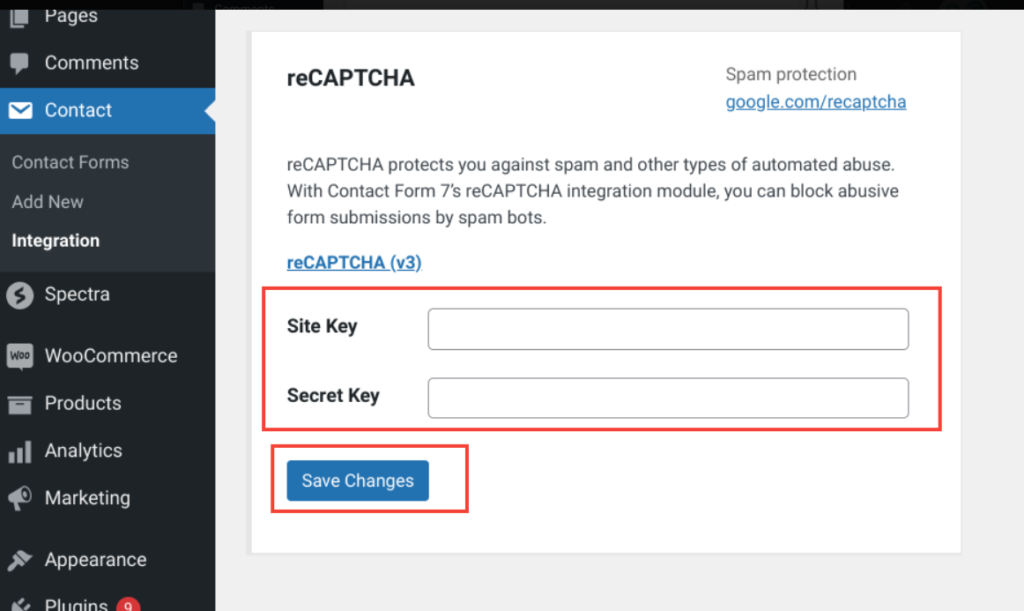
- Enter the site key and secret key that you got from the Google reCAPTCHA admin page.
- Finally, click on “Save Changes”.
That’s it. You have now successfully added reCaptcha in Contact Form 7.
Don’t Need To Add reCAPTCHA Form-Tag Anymore
That’s it! Your contact forms now use reCAPTCHA’s score to determine whether the submission is from a human or a spam bot.
Remember, with reCAPTCHA v3, there is no need for a CAPTCHA widget, such as the “I’m not a robot” checkbox used in reCAPTCHA v2. This means you no longer need to include [recaptcha] form-tag in your form templates.
If there is a [recaptcha] form-tag in a form template, Contact Form 7 version 5.1 or higher will ignore it and replace it with an empty string.
Have any questions? Feel free to ask in the comments section below—we’re here to help!

![How to Add reCAPTCHA to Contact Form 7 [2 Easy Steps] How to Add reCAPTCHA to Contact Form 7](https://www.wpdisc.com/wp-content/uploads/2024/07/how-to-add-recaptcha-to-contact-form-7-1024x512.png)

![How to Have 2 Lines of Text in WordPress Header [5 Easy Ways] How to Have 2 Lines of Text in WordPress Header [5 Easy Ways]](https://www.wpdisc.com/wp-content/uploads/2025/02/how-to-have-2-lines-of-text-in-wordpress-header-1024x520.png)

![How to Clone My Website to a Second URL [9 Easy Steps] How to Clone My Website to a Second URL [9 Easy Steps]](https://www.wpdisc.com/wp-content/uploads/2025/01/how-to-clone-my-website-to-a-second-url-1024x520.png)
Leave a Reply