Are you searching for an easy method to add CAPTCHA to contact form in WordPress? You’re in the right place.
Adding CAPTCHA helps stop spam submissions from bots, keeping your inbox clean. The good news is that integrating it with your WordPress contact form is a simple process anyone can follow.
In this guide, you’ll learn how to add CAPTCHA to your WordPress contact form in three easy steps. Plus, we’ll explore the key reasons why implementing CAPTCHA is a smart move.
Ready? Let’s dive in!
Why Are The Reasons to Add CAPTCHA to Contact Form in WordPress?
Most WordPress contact forms don’t come with built-in spam protection. Adding CAPTCHA is an effective way to enhance security and improve the overall functionality of your forms. By implementing CAPTCHA, you can reduce spam, prevent misuse, and make sure only genuine users interact with your site.
Here are the key reasons to add CAPTCHA to your WordPress contact form:
- Block Spam Submissions: CAPTCHA stops automated bots from flooding your forms with spam, keeping your inbox clean and manageable.
- Build Visitor Trust: A spam-free and secure form reassures users that their interaction with your site is safe and reliable.
- Boost Website Security: CAPTCHA adds a layer of protection against malicious attempts, confirming that submissions come from real people.
- Reduce Server Strain: Filtering out bot traffic helps decrease unnecessary server load, which can improve your website’s overall performance.
- Simple Setup: Adding CAPTCHA to most WordPress contact forms is straightforward and doesn’t require advanced technical skills.
In this guide, we’ll use Contact Form 7, a popular and free tool, to demonstrate the steps for adding CAPTCHA.
WordPress Contact Form 7: Why Should You Use It?
A contact form offers visitors an organized and reliable way to get in touch with you. It keeps your communication structured while maintaining a professional appearance.
For WordPress users, Contact Form 7 provides an excellent solution for creating contact forms without any coding experience. This makes it an ideal choice for both beginners and seasoned website owners.
Here are some compelling reasons to use Contact Form 7 for your WordPress site:
- Completely Free: You can use Contact Form 7 without worrying about hidden costs or premium upgrades.
- Highly Customizable: Modify your forms with various settings or use CSS to give them a unique look that aligns with your site’s design.
- Beginner-Friendly: Its straightforward interface allows users of all skill levels to create and manage forms effortlessly.
- Compatible with Any Theme: Whether you use a free or premium theme, Contact Form 7 adapts to your setup, making it a reliable choice even if you change themes.
- Packed with Features: With tools like AJAX-powered submissions, CAPTCHA integration, and Akismet anti-spam support, this plugin delivers robust functionality to enhance form performance and security.
If you’re looking for a versatile, feature-rich, and user-friendly contact form plugin, Contact Form 7 is a top choice.
3 Easy Steps to Add CAPTCHA to Contact Form in WordPress
You have various CAPTCHA services available for integration into your WordPress contact form, but this guide focuses on using Google reCAPTCHA for spam protection.
We will start by installing the Contact Form 7 plugin, registering the website with Google, and creating reCAPTCHA API keys. Next, we will configure reCAPTCHA within Contact Form 7.
Let’s proceed with the steps one by one.
Step #1: Install the Contact Form 7 Plugin
The first step is to install the Contact Form 7 plugin. You can either download it from the WordPress.org plugin directory or install it directly through your WordPress dashboard.
Here’s how to install it from your dashboard:
- Navigate to your WordPress dashboard.
- Click on the Plugins menu, and then select Add New Plugin.

- In the search bar, type Contact Form 7.
- Once the plugin appears in the search results, click Install Now.
- After the installation is complete, click Activate to enable the plugin.
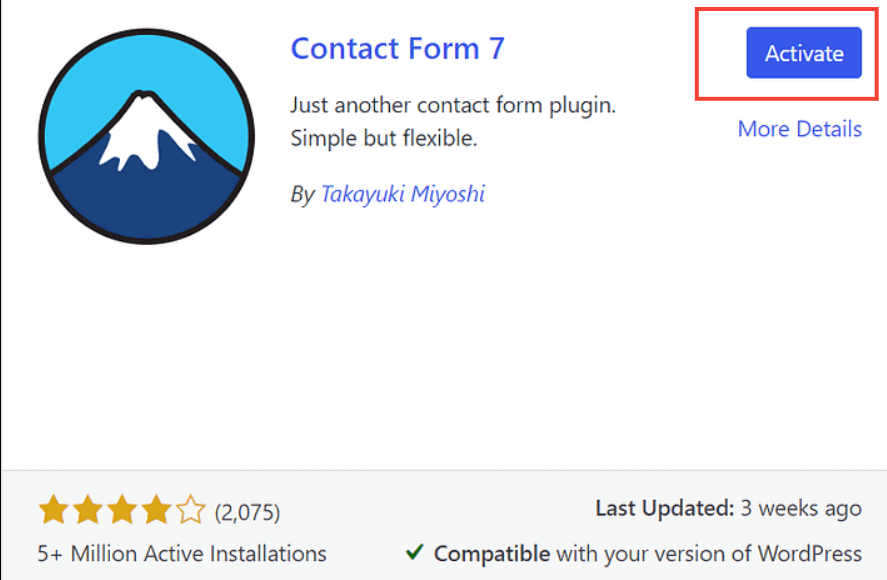
Once activated, a new Contact section will appear in your WordPress dashboard menu. This is where you can start managing and creating contact forms.

From here, you have two options:
- Use the default contact form provided by the plugin.
- Create a custom contact form tailored to your needs.
In the following section, we’ll explore both options to help you get started with Contact Form 7.
Option #1: Use the Default Contact Form 7 Form
After you install Contact Form 7, the plugin automatically creates a simple contact form you can use right away. Follow these steps to set it up:
Step 1: Locate the Default Form
After activating the Contact Form 7 plugin, go to your WordPress dashboard.
- Navigate to Contact → Contact Forms.
- Look for Contact Form 1, which the plugin creates by default.

Step 2: Add the Form to a Post or Page
To embed the form, open the post or page where you want it to appear.
- Add a Contact Form 7 block by selecting it from the available block options.
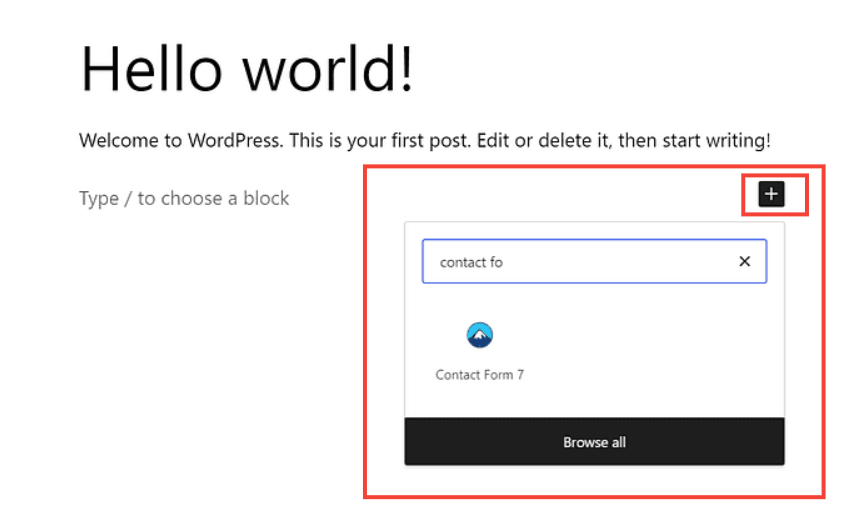
- From the dropdown menu, select Contact Form 1.
NOTE: If you’re using the Classic Editor instead of Gutenberg, you can switch to Gutenberg by following a guide specific to your WordPress version.
Step 3: Preview the Form
Preview the page to check how the form looks on your site. Make sure it displays correctly and works as intended.
Alternative: Use the Shortcode
If you prefer using a shortcode:
- In the Contact Forms section, locate the shortcode next to Contact Form 1.
- Copy the shortcode and paste it into the desired post or page using the Shortcode block.
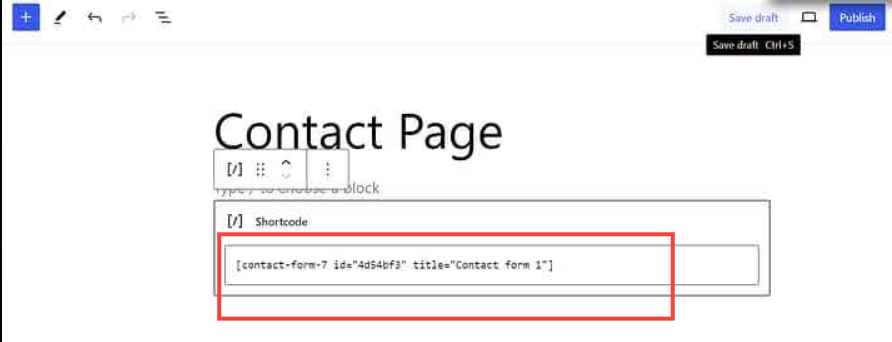
Step 4: Publish the Form
After adding the form, publish the post or page. Visitors can now use the form to contact you, and their messages will be sent to the primary email address linked to your WordPress site.
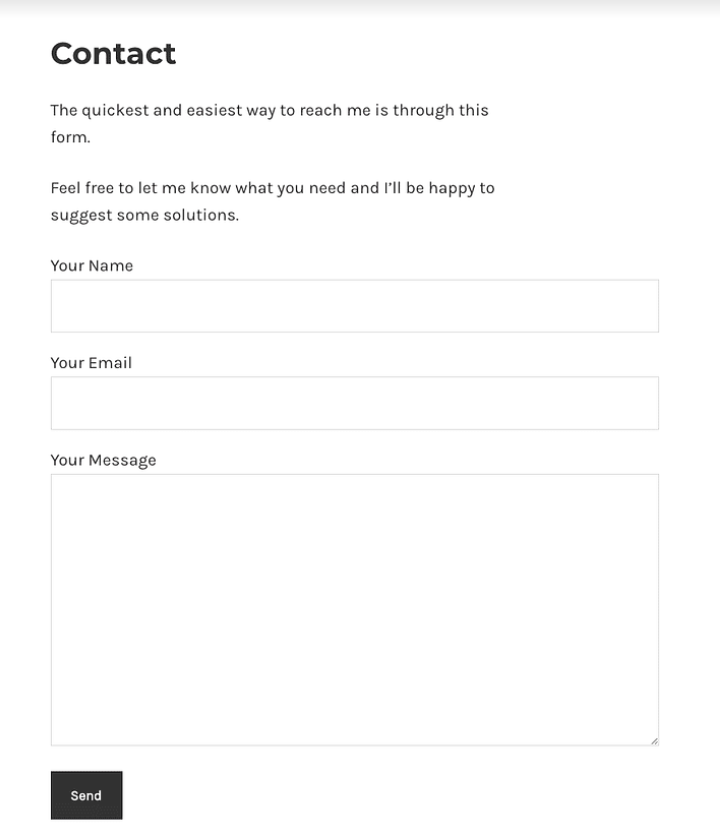
By following these steps, you can make full use of the default form provided by Contact Form 7.
Option #2: Create Your Custom Form using Contact Form 7
If you want to design a custom form that meets your specific needs, follow these steps to create one using Contact Form 7.
Step 1: Start a New Form
- Go to your WordPress dashboard.
- Navigate to Contact → Add New.
- Enter a name for your new form to identify it later.
Step 2: Review and Customize Form Fields
The default form includes fields like name, email, subject, and message.
- Decide which fields to keep, remove, or modify based on your requirements.
- Add new fields if necessary to enhance the form.
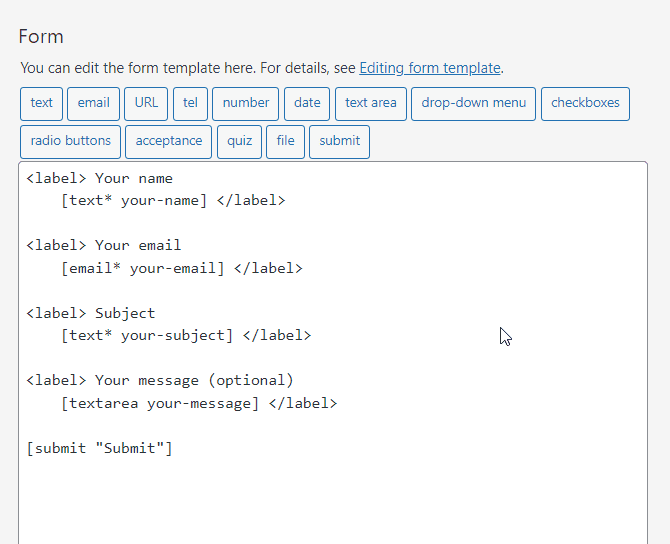
Step 3: Add a New Field
To include a new field:
- Select the desired tag from the options above the form editor (e.g., tel for a phone number field).
- A popup window will appear with customization options for the field.

Step 4: Configure the New Field
In the popup:
- Set parameters like Name, Default Value, ID, and Class Attributes.
- Check the box for “Required Field” if the field needs to be mandatory.
- Click Insert Tag to add the field to your form.
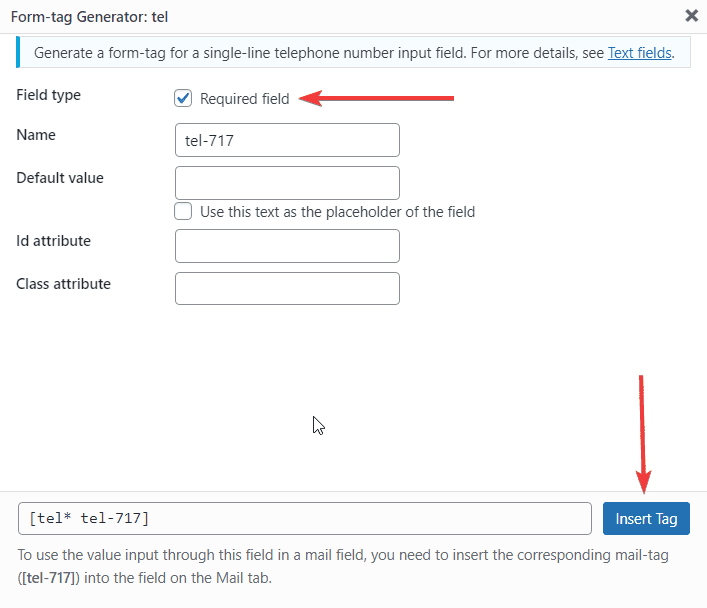
Step 5: Add a Label for the New Field
Add a descriptive label for the new field:
- Use <label> and </label> tags to wrap the field.
- Include the tag for the field (e.g., tel* for a required phone number).
- Add text next to the field, such as “Phone Number.”
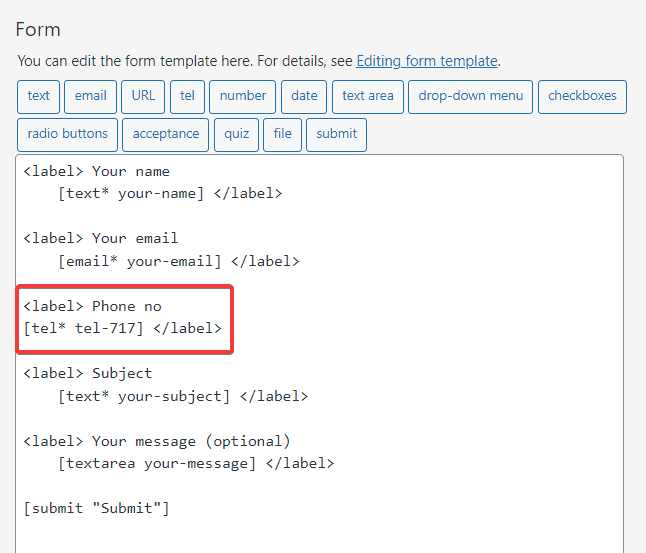
Step 6: Save Your Custom Form
- Click the Save button to store your changes and finalize the form.
Step 7: Embed the Form on Your Website
- Copy the shortcode for the new form displayed in the editor.
- Paste the shortcode into a post or page using the Shortcode block or insert it with the Contact Form block.
- Preview the page to confirm that the form looks and functions as intended.
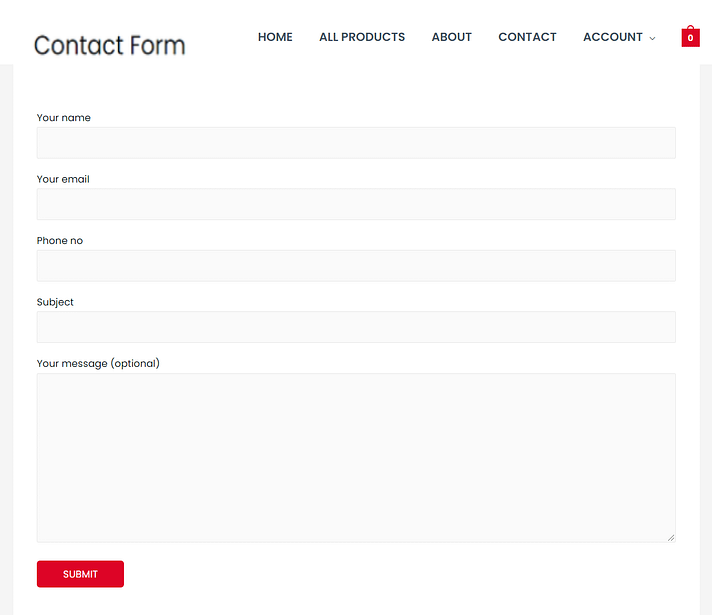
Once you’ve completed these steps, you’ve successfully created a custom form tailored to your needs using Contact Form 7.
Step #2: Create reCAPTCHA API Keys
To connect reCAPTCHA with Contact Form 7, you need to obtain API keys from Google. Follow these steps to generate the keys:
- Visit the Google reCAPTCHA admin page.
- Log in using your Google account.
- Select the “v3 Admin Console” option.
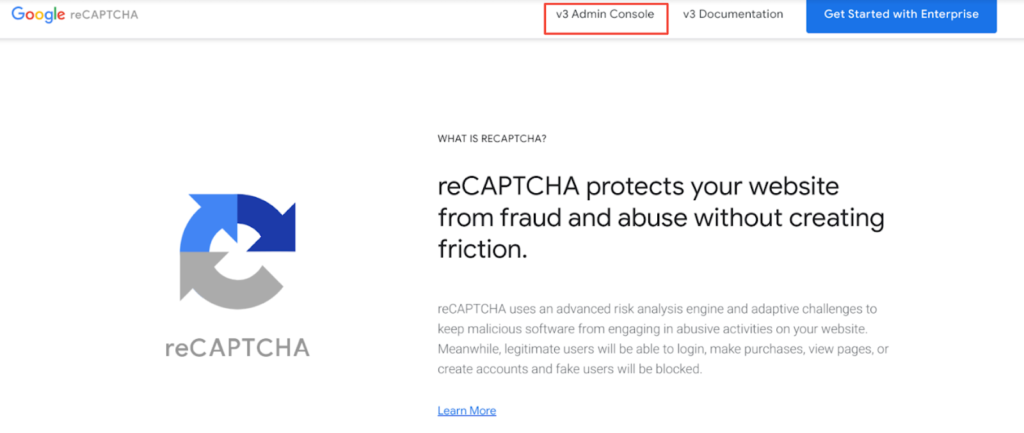
On the registration page, fill in the required details to create the API keys:
- Label: Enter a name for your site to identify it easily.
- reCAPTCHA Type: Choose either v3 or v2, depending on your preference.
- Domain: Under the Domains section, add your website’s domain next to the “+” icon.
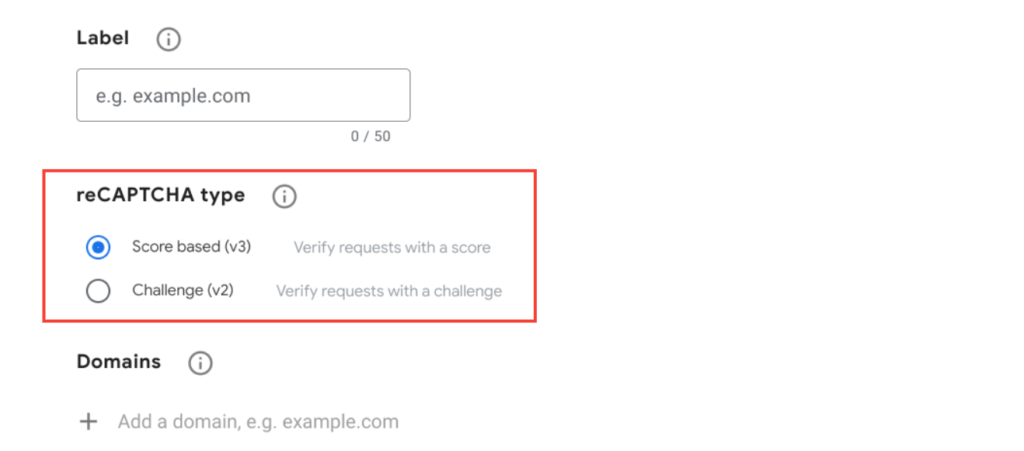
After entering the details, scroll down and click Submit.

Google will then generate your Site Key and Secret Key.
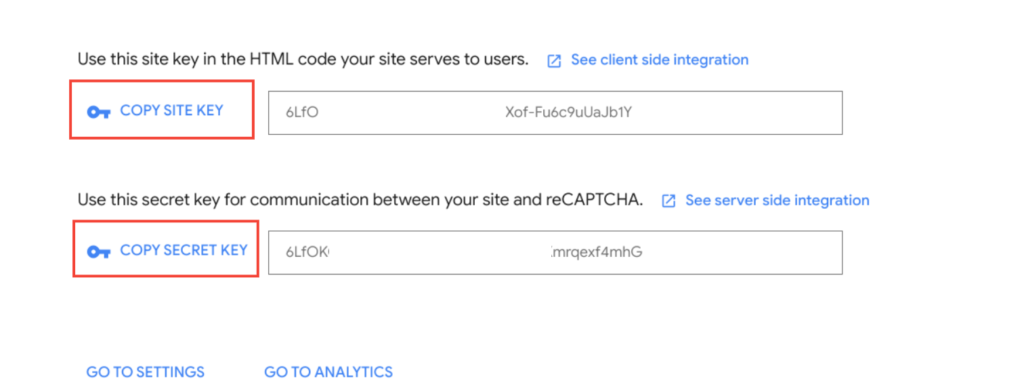
Keep these keys in a secure location, as you’ll use them in the next step to set up reCAPTCHA for your contact form.
Step #3: Set Up reCAPTCHA for Contact Form 7
After obtaining your API keys, the next step is to set up reCAPTCHA for Contact Form 7 on your WordPress site. Follow these steps to complete the setup:
- Log in to your WordPress admin dashboard.
- Navigate to Contact → Integration in the sidebar menu.
- On the integration page, locate the reCAPTCHA section and click on Setup Integration.
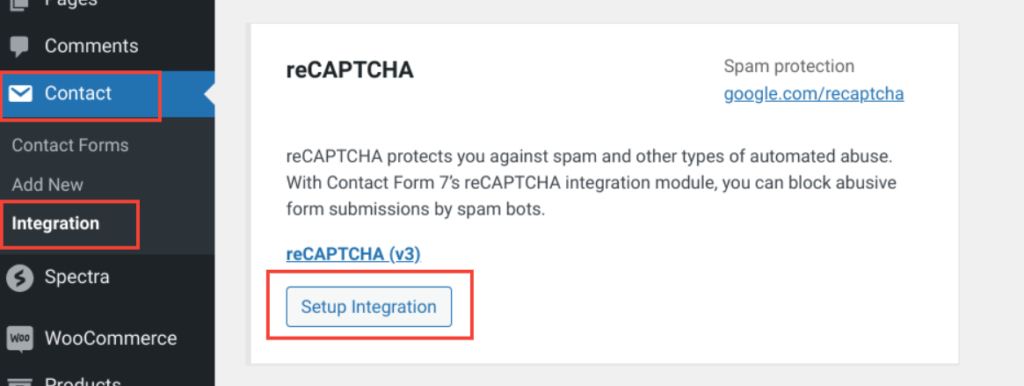
You’ll now see fields where you can input your API keys:
- Paste the Site Key into the designated field.
- Paste the Secret Key into the corresponding field.
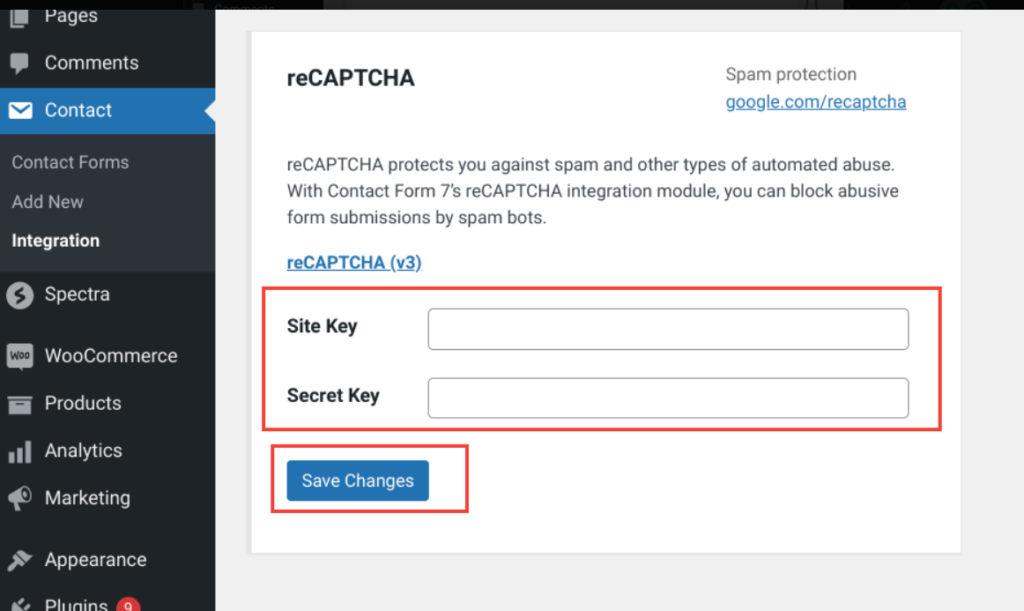
- Click Save Changes to finalize the setup.
You’ve now successfully added reCAPTCHA to your Contact Form 7 plugin. With this configuration, your forms are equipped to prevent spam and bot submissions effectively.
💡You might want to read this, 👉How to Redirect Contact Form 7 to Thank You Page [2 Easy Ways]
NOTE: No Need To Add the reCAPTCHA Form-Tag Anymore
That’s it! Your contact forms now utilize reCAPTCHA’s scoring system to evaluate whether a submission is genuine or from a spam bot.
With reCAPTCHA v3, you don’t need to include a CAPTCHA widget, like the familiar “I’m not a robot” checkbox used in reCAPTCHA v2. This also eliminates the need to manually add the [recaptcha] form tag in your templates.
If a form template contains the [recaptcha] tag, Contact Form 7 (version 5.1 or higher) automatically ignores it and replaces it with an empty string.
Have questions or need clarification about “How to add CAPTCHA to Contact Form in WordPress”? Drop your queries in the comments section below—we’re happy to assist!

![How to Add CAPTCHA to Contact Form in WordPress [3 Easy Steps] How to Add CAPTCHA to Contact Form in WordPress](https://www.wpdisc.com/wp-content/uploads/2024/12/Add-CAPTCHA-to-Contact-Form-in-WordPress-1024x512.png)

![How to Have 2 Lines of Text in WordPress Header [5 Easy Ways] How to Have 2 Lines of Text in WordPress Header [5 Easy Ways]](https://www.wpdisc.com/wp-content/uploads/2025/02/how-to-have-2-lines-of-text-in-wordpress-header-1024x520.png)

![How to Clone My Website to a Second URL [9 Easy Steps] How to Clone My Website to a Second URL [9 Easy Steps]](https://www.wpdisc.com/wp-content/uploads/2025/01/how-to-clone-my-website-to-a-second-url-1024x520.png)
Leave a Reply